

In this project information from multiple ESP8266 boards via the ESP-NOW communication protocol with a one-to-Many scenario. several ESP boards send the data we want to one board. There is no such thing as a transmitter or receiver in ESP-NOW documents. Each ESP8266 board can be a transmitter or a receiver. However, we will use these terms to describe the status of each board in the project. Visit CiferTech for more tutorials, and be sure to follow my Instagram page to support me.

ESP-Now protocol
ESP-NOW is a wireless communication protocol developed by Espressif and capable of packet transmission. This protocol enables multiple devices to easily communicate with each other and transfer information optimally between each other. This protocol is similar to the 2.4 GHz wireless connection, often used in wireless mice. Therefore, it is necessary to pair the devices before communicating. This means that the connection is stable after the devices are paired with each other. In other words, if one of your ESPs suddenly shuts down or resets, the connection is established automatically when you restart.

Advantages of ESP-NOW protocol
- Data transfer up to 250 bytes.
- Benefit from an encrypted communication.
- Use Call Back to notify different layers if data transfer is successful or not.
ESP-NOW protocol limitations :
- Maximum limit of 250payload bytes.
- Maximum support for 10 encrypted SoftAPs.
- The maximum number of backups in unencrypted mode is 20.
The scenario of this project
In this project, we will use the scenario of one Master and several Slaves. In this case, an ESP sends different or identical commands to other ESPs, the idea being that with this scenario you can control several different devices that have an ESP with one ESP32.
Project Description
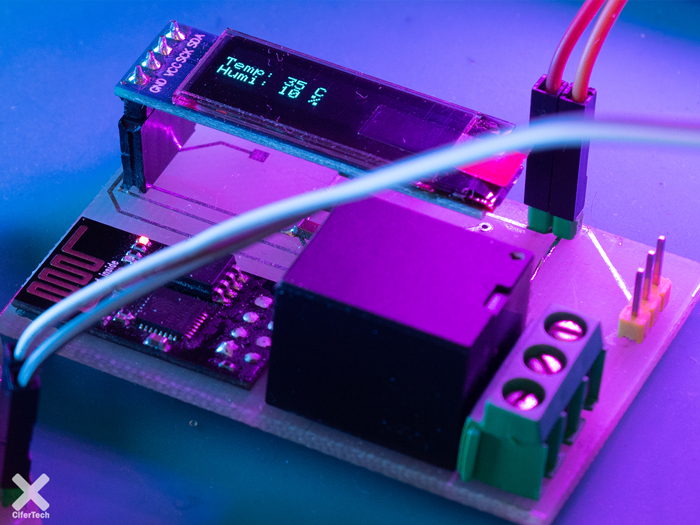
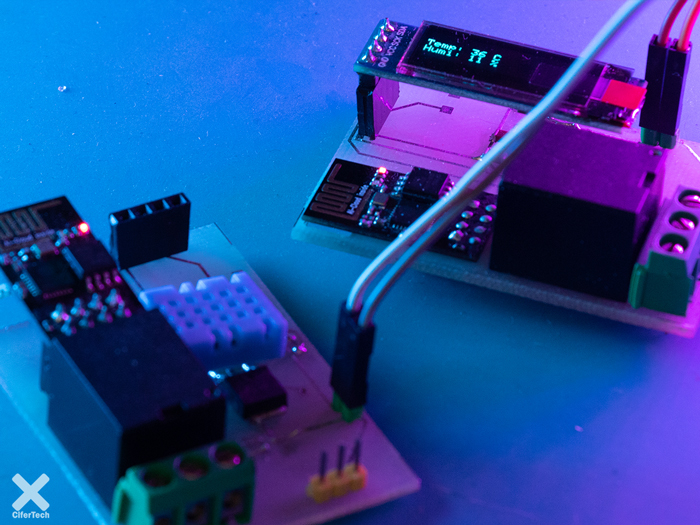
In this project, we used two ESP8266 boards, version 01, which are assembled in a personalized PCB, in one of the boards, or in other words, our nodes, an OLED display is installed to display the received items, and in the other board. A DHT11 sensor is installed to measure temperature and humidity. This way we will be able to collect more data by increasing the nodes.
Items needed
- ESP board based on ESP8266 chip
- DHT11 sensor
- 10k resistance
- Oled display
ESP8266 MAC address
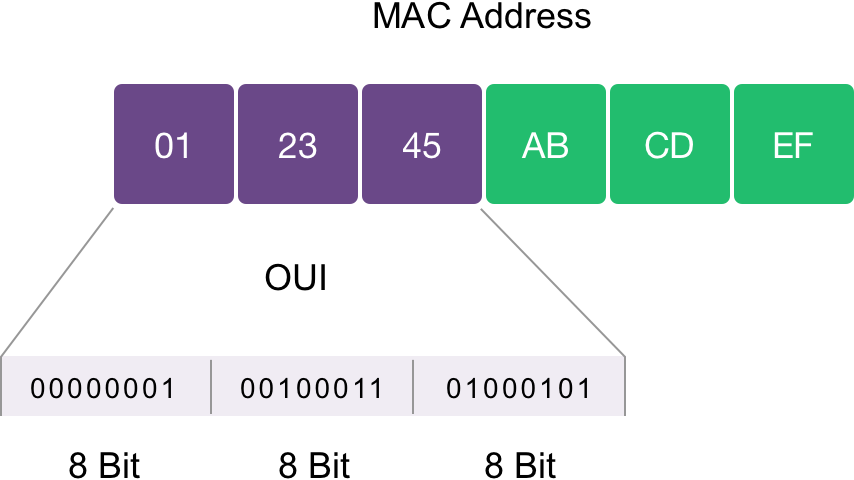
Before we learn how to get these MACs, it’s best to learn the meaning and concept of MACs and why they exist at all! Well, if a device is to be connected to the Internet, it will be assigned a total of two addresses, first the ip, which is a logical address, and then the MAC address, which is the physical address for our device and is practically a fingerprint. Today’s smart devices. Also abbreviated MAC letters are Media Access Control. MAC addresses consist of 48 bits with hexadecimal digits and are found with a structure like this xx: xx: xx: xx: xx: xx and each xx is equal to 8 bits or one byte. Look at the picture below! The first 24 bits are specified by the manufacturer of the style card, and the second 24 bits show the number of devices that can be numbered.
To communicate between ESP32 boards, we need to know their MAC address, because, in the process of transferring data or pairing each board, it checks the identity of the other board. And each ESP32 has its own MAC address to be authenticated. To get this MAC address, upload the following code in your ESP32. After uploading the code, you can see your MAC address in the Arduino IDE monitor serial. Save the MAC address because we need it in the main project.
|
1 2 3 4 5 6 7 8 9 |
#include "WiFi.h" void setup(){ Serial.begin(115200); WiFi.mode(WIFI_MODE_STA); Serial.println(WiFi.macAddress()); } void loop(){ |
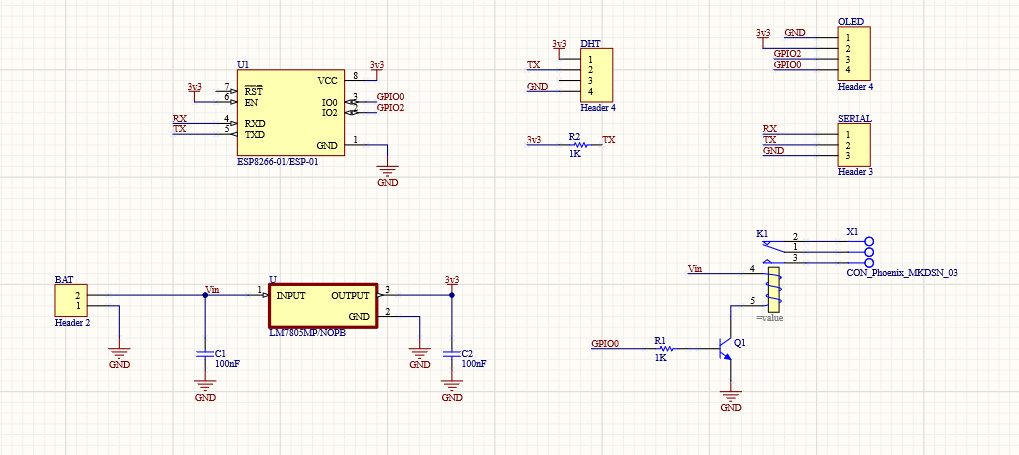
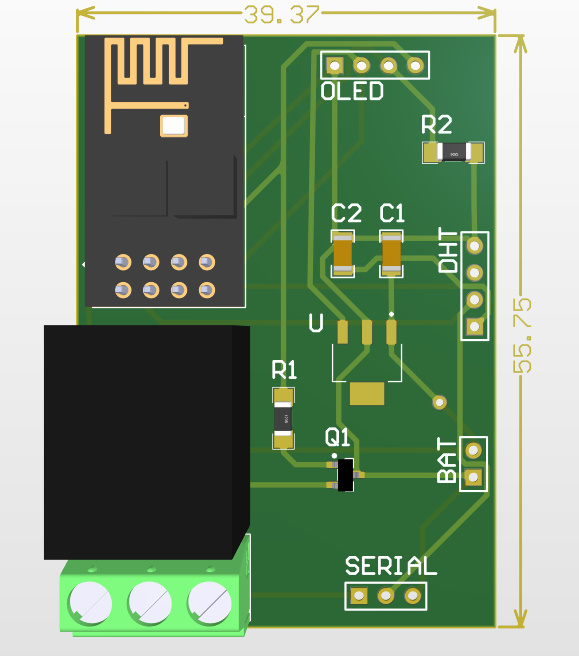
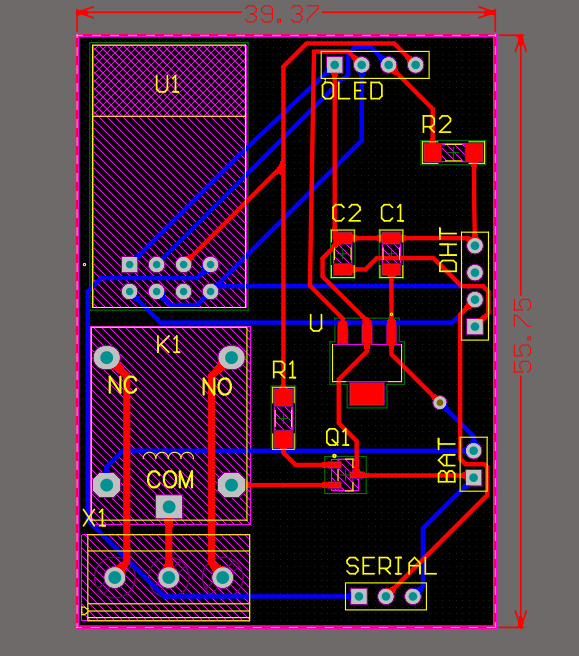
PCB
In order to establish connections in this project, we use a PCB designed with the help of Altium Designer. This circuit includes the connections required for OLE modules and DHT11 sensor, as well as the power input and serial output to program the board. There is also a relay in this circuit that will not work due to a bug in this version of the PCB.
Slave ESP code
|
1 2 3 4 5 6 7 8 9 10 11 12 13 14 15 16 17 18 19 20 21 22 23 24 25 26 27 28 29 30 31 32 33 34 35 36 37 38 39 40 41 42 43 44 45 46 47 48 49 50 51 52 53 54 55 56 57 58 59 60 61 62 63 64 65 66 67 68 69 70 71 72 73 74 75 76 |
#include <ESP8266WiFi.h> #include <espnow.h> #include <Adafruit_Sensor.h> #include <DHT.h> #include <DHT_U.h> #define DHTPIN 1 DHT dht(DHTPIN, DHT11); uint8_t broadcastAddress[] = {0xFC, 0xF5, 0xC4, 0x82, 0xCD, 0x49}; ) #define BOARD_ID 1 typedef struct struct_message { int id; int x; int y; } struct_message; struct_message myData; unsigned long lastTime = 0; unsigned long timerDelay = 10000; void OnDataSent(uint8_t *mac_addr, uint8_t sendStatus) { Serial.print("\r\nLast Packet Send Status: "); if (sendStatus == 0){ Serial.println("Delivery success"); } else{ Serial.println("Delivery fail"); } } void setup() { Serial.begin(115200); dht.begin(); //sensor_t sensor; //dht.temperature().getSensor(&sensor); //dht.humidity().getSensor(&sensor); WiFi.mode(WIFI_STA); WiFi.disconnect(); if (esp_now_init() != 0) { Serial.println("Error initializing ESP-NOW"); return; } esp_now_set_self_role(ESP_NOW_ROLE_CONTROLLER); esp_now_register_send_cb(OnDataSent); esp_now_add_peer(broadcastAddress, ESP_NOW_ROLE_SLAVE, 1, NULL, 0); } void loop() { //sensors_event_t event; //dht.temperature().getEvent(&event); //dht.humidity().getEvent(&event); float h = dht.readHumidity(); float t = dht.readTemperature(); if ((millis() - lastTime) > timerDelay) { myData.id = BOARD_ID; myData.x = t; myData.y = h; esp_now_send(0, (uint8_t *) &myData, sizeof(myData)); lastTime = millis(); } } |
- This part of the code is the MAC address of the Master board that is entered on all Slave boards.
|
1 |
uint8_t broadcastAddress[] = {0xFC, 0xF5, 0xC4, 0x82, 0xCD, 0x49}; |
- In the description, we mentioned that if the number of slaves increases, an ID will be specified for each board, in this line of code, you must make the relevant changes. In fact, each Slave board has its own unique ID.
|
1 |
#define BOARD_ID 1 |
- This section deals with the data structure in the ESP-NOW network we use, the first option is the specific id for each board and the other two are for storing our data in this project, which in our scenario is related to temperature and humidity values.
Final result
Finally, after uploading both codes introduced in ESP8266 boards, all the mentioned items related to the prerequisite settings are observed. You will see the values displayed on the OLED display, or you can print the values on the Arduino software monitor serial if needed. Finally, the values will be sent by Slave boards to our Master board.