
In this project, using the one-way scenario of ESP-NOW protocol, we will send the values of the MPU6050 module including x, y, z to the destination board. In other words, with a remote ESP board, we send information to another board by moving the acceleration and gyro sensors in space. To send information, the MPU6050 sensor will be analyzed on the ESP32 board and sent to the ESP8266 chip to the Wemos board. Visit CiferTech for more tutorials, and be sure to follow my Instagram page to support me.
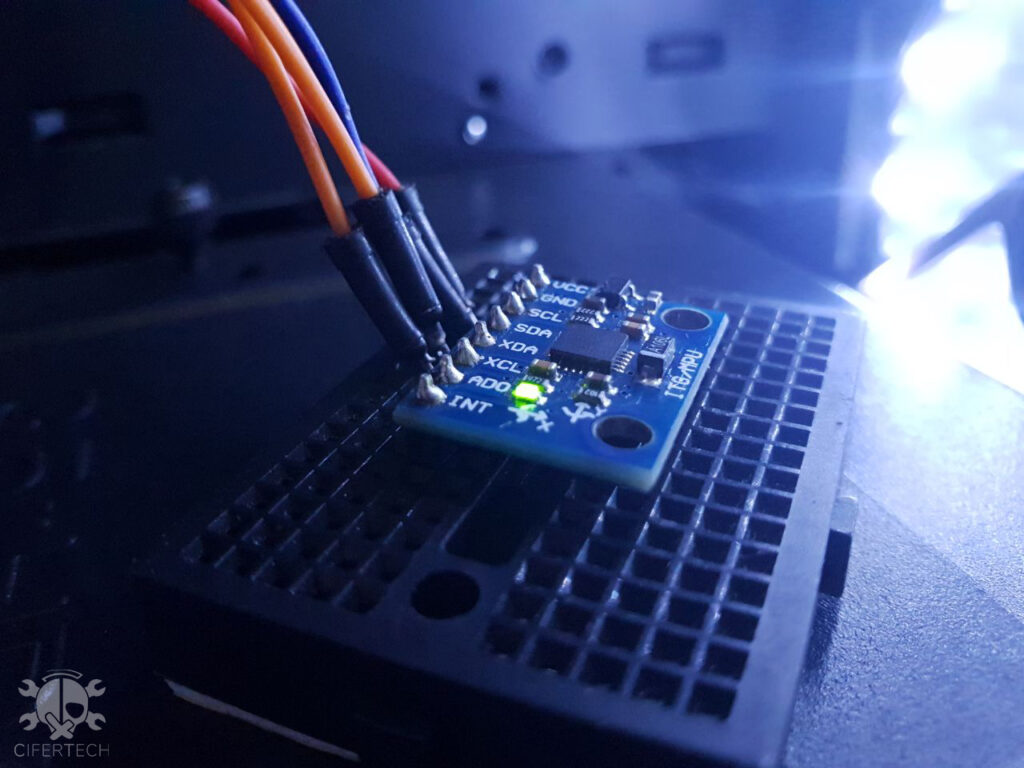
MPU6050 module
Now it’s time to get more familiar with the main hardware of this tutorial, the MPU6050. The Mpu6050 has a three-axis accelerometer and a MEMS three-axis gyroscope. The accuracy of the analog-to-digital converter module is 12 bits and it can measure the values of X, Y, Z at the same time. The buffer of this module is FIFO with a capacity of 1024 bytes. This module is connected to the Arduino as a Slave by SCL and SDA pins. Using a digital processor, it provides 4 outputs to achieve remarkable accuracy in slow and fast movements of the sensor. In this way, the user can change the measurement range according to acceleration or speed. For this purpose, in the gyroscope part, the four-phase sensor 250 ±, 500%, 1000 ± and 2000 ± degrees per second and in the accelerometer part, the four-phase sensor 2g, ± 4g, ± 8g, ± 16g will be selectable for the user. Note that the operating voltage of this module is 3 to 5 volts.
ESP-Now protocol
The ESP-NOW protocol is a type of wireless communication developed by Espressif and capable of packet transmission. This protocol enables multiple devices to easily communicate with each other and transfer information optimally between each other. This protocol is similar to the 2.4 GHz wireless connection, often used in wireless mice. Therefore, it is necessary to pair the devices before communicating. This means that the connection is stable after the devices are paired with each other. In other words, if one of your ESPs suddenly shuts down or resets, the connection is established automatically when you restart.
Advantages of ESP-NOW protocol:
- Data transfer up to 250 bytes.
- Benefit from an encrypted communication.
-
Use Call Back to notify different layers if data transfer is successful or not.
ESP-NOW protocol limitations:
- Maximum limit of 250payload bytes.
- Maximum support for 10 encrypted SoftAPs.
- The maximum number of backups in unencrypted mode is 20.
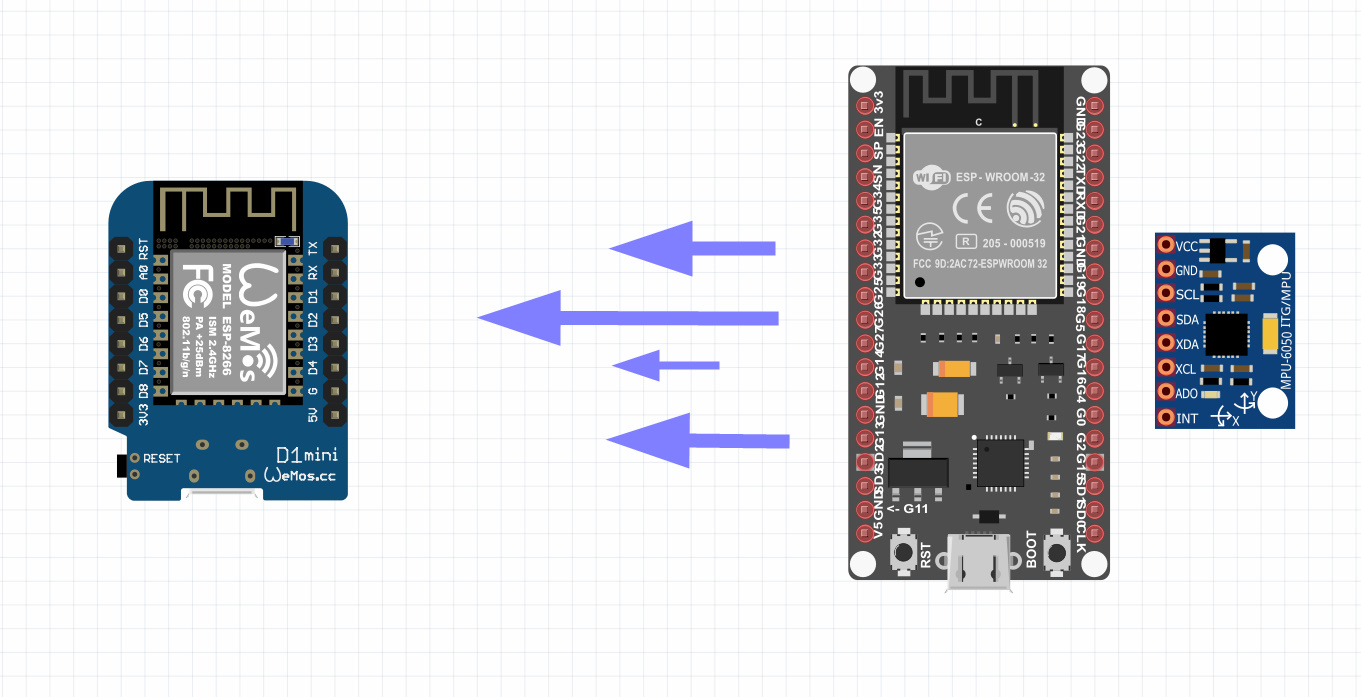
The role of sender and receiver
In the MPU6050 sensor data transmission project, we have used two Wi-Fi boards for data analysis and communication with the ESP NOW protocol, which is one of the tasks of analyzing the values obtained from the mpu6050 module and sending the values to the Has a second board or receiver. Next, we have the receiver board, which we have used ESP8266 in this project, and this chip has the task of coordinating with the first board in the scenario, ie the sender board, and also according to the pre-defined structure, the values are received, analyzed and serialized. Displays the monitor.
MPU6050 sensor data transmission project
In the MPU6050 sensor data transmission project, we will first analyze the values obtained from the MPU6050 sensor using the ESP32 board, and by launching the ESP-NOW protocol, we will send the values to the second board, Wemos. The values obtained will be visible in the monitor serial, and in the sender board, the data sending status will be reported after sending each payload.
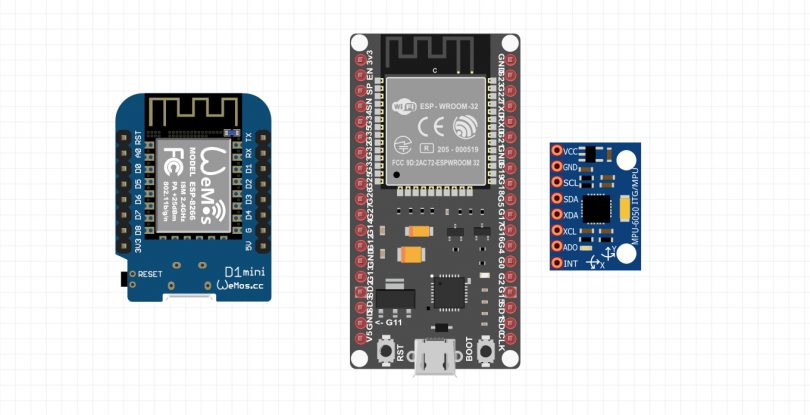
Items needed
- wemos
- ESP board based on ESP8266 or ESP32 chip
- Gyro module MPU6050
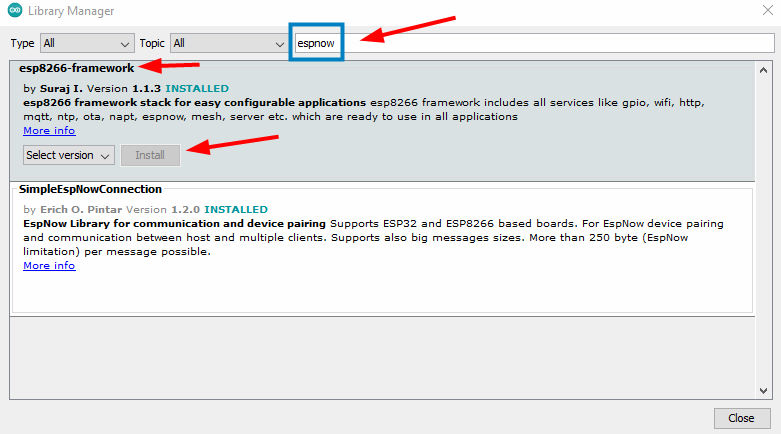
Install the reference library
If you receive any error that the esp now.h library does not exist, follow the steps below.
- Follow this path Sketch > Include Library > Manage Libraries
- Search for the word esp now.
- Install the library.
Transmitter code and schematic
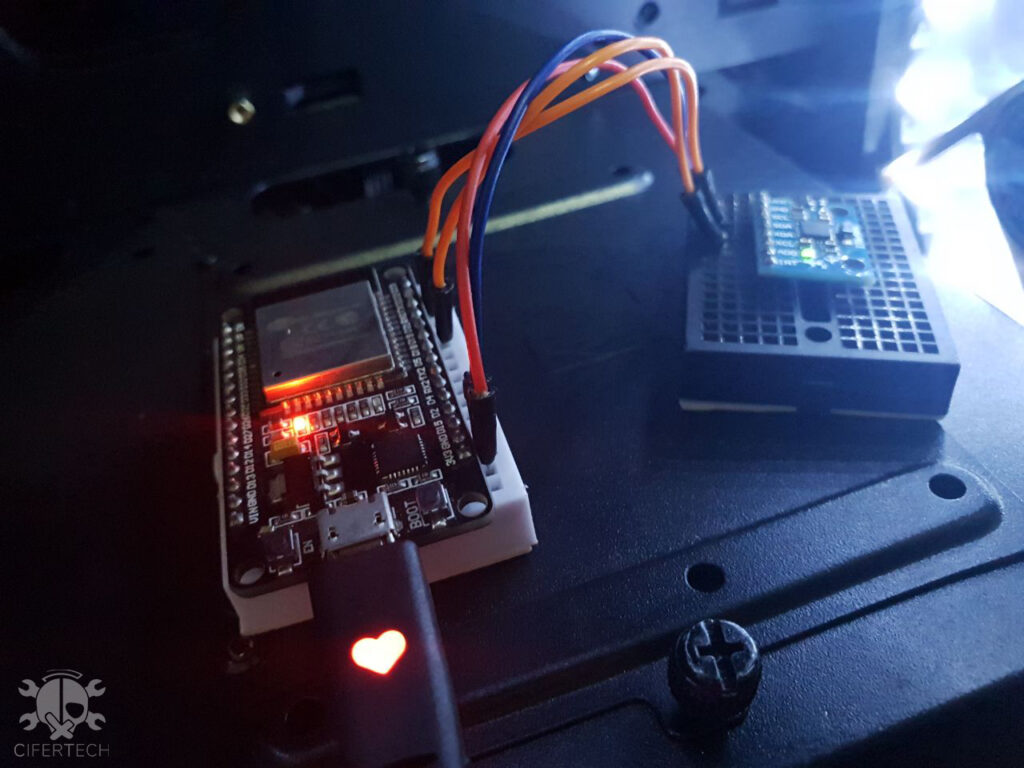
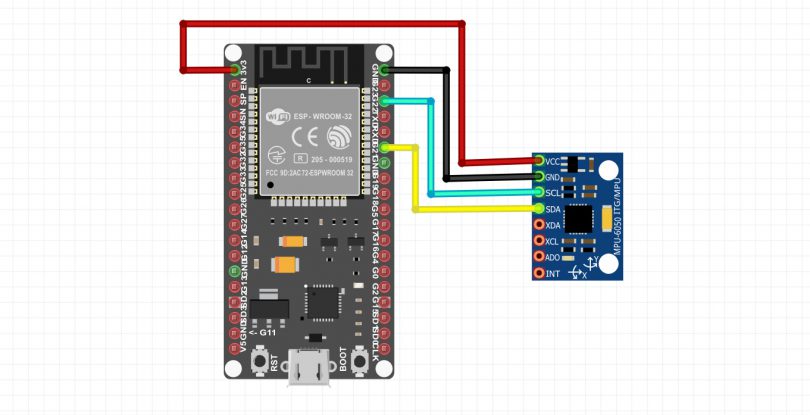
In this step, we first establish the connections between the MPU6050 module and the ESP32 board. The mpu6050 module uses the i2c protocol for booting, so it can only be booted using the two pins SCL, SDA, and also the power supply of the module. Make the connections according to the table or schematic below.
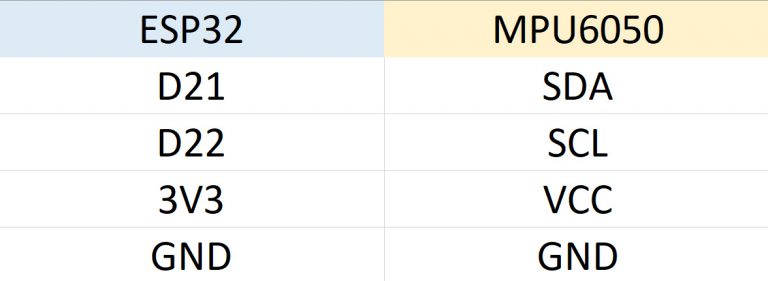
- MPU6050 Transmitter Schematic and Data Analysis
After the connections, it is time to send the project code of MPU6050 sensor information. First, we will examine some parts of this code, but as you have noticed so far, this project consists of two parts of code, which we will discuss in the following. In the first few lines, we call the required libraries.
|
1 2 3 4 5 6 7 |
#include <esp_now.h> #include <WiFi.h> #include <SPI.h> #include "I2Cdev.h" #include "MPU6050.h" |
In this section, we enter the recipient’s ESP MAC address as a hex, which is actually located behind both letters or the 0x digit.
|
1 |
uint8_t broadcastAddress1[] = {0xBC,0xDD,0xC2,0xB3,0xC4,0xC2}; |
In this section we will build our data structure, since the values x, y, z will be received, such variables will be defined in relation to them.
|
1 2 3 4 5 |
typedef struct test_struct { int x; int y; int z; } test_struct; |
We call the values obtained from the MPU6050 module that we obtained and stored in the first part of the code in the loop section.
|
1 |
accelgyro.getMotion6(&ax, &ay, &az, &gx, &gy, &gz); |
Complete code of this part of the project to send values
|
1 2 3 4 5 6 7 8 9 10 11 12 13 14 15 16 17 18 19 20 21 22 23 24 25 26 27 28 29 30 31 32 33 34 35 36 37 38 39 40 41 42 43 44 45 46 47 48 49 50 51 52 53 54 55 56 57 58 59 60 61 62 63 64 65 66 67 68 69 70 71 72 73 74 75 76 77 78 79 80 81 82 83 84 85 86 87 88 89 90 91 92 93 94 95 96 97 98 |
#include <esp_now.h> #include <WiFi.h> #include <SPI.h> #include "I2Cdev.h" #include "MPU6050.h" MPU6050 accelgyro; int16_t ax, ay, az; int16_t gx, gy, gz; #define OUTPUT_READABLE_ACCELGYRO uint8_t broadcastAddress1[] = {0xBC,0xDD,0xC2,0xB3,0xC4,0xC2}; typedef struct test_struct { int x; int y; int z; } test_struct; test_struct test; void OnDataSent(const uint8_t *mac_addr, esp_now_send_status_t status) { char macStr[18]; Serial.print("Packet to: "); // Copies the sender mac address to a string snprintf(macStr, sizeof(macStr), "%02x:%02x:%02x:%02x:%02x:%02x", mac_addr[0], mac_addr[1], mac_addr[2], mac_addr[3], mac_addr[4], mac_addr[5]); Serial.print(macStr); Serial.print(" send status:\t"); Serial.println(status == ESP_NOW_SEND_SUCCESS ? "Delivery Success" : "Delivery Fail"); } void setup() { Serial.begin(115200); #if I2CDEV_IMPLEMENTATION == I2CDEV_ARDUINO_WIRE Wire.begin(); #elif I2CDEV_IMPLEMENTATION == I2CDEV_BUILTIN_FASTWIRE Fastwire::setup(400, true); #endif accelgyro.initialize(); WiFi.mode(WIFI_STA); if (esp_now_init() != ESP_OK) { Serial.println("Error initializing ESP-NOW"); return; } esp_now_register_send_cb(OnDataSent); esp_now_peer_info_t peerInfo; peerInfo.channel = 0; peerInfo.encrypt = false; memcpy(peerInfo.peer_addr, broadcastAddress1, 6); if (esp_now_add_peer(&peerInfo) != ESP_OK){ Serial.println("Failed to add peer"); return; } } void loop() { accelgyro.getMotion6(&ax, &ay, &az, &gx, &gy, &gz); test.x = random(ax); test.y = random(ay); test.z = random(az); esp_err_t result = esp_now_send(0, (uint8_t *) &test, sizeof(test_struct)); if (result == ESP_OK) { Serial.println("Sent with success"); } else { Serial.println("Error sending the data"); } delay(500); } |
Reference code for receiving data on the Wemos board
In the receiver section, after calling the libraries and setting the data structure, as in the previous section, we introduce the received data to the protocol so that it can be displayed.
|
1 |
memcpy(&myData, incomingData, sizeof(myData)); |
In these two lines, we specify whether ESP is the master or slave position and the current state.
|
1 2 |
esp_now_set_self_role(ESP_NOW_ROLE_SLAVE); esp_now_register_recv_cb(OnDataRecv); |
Complete code of the project receiver section of MPU6050 sensor information
|
1 2 3 4 5 6 7 8 9 10 11 12 13 14 15 16 17 18 19 20 21 22 23 24 25 26 27 28 29 30 31 32 33 34 35 36 37 38 39 40 41 42 43 44 45 46 47 48 |
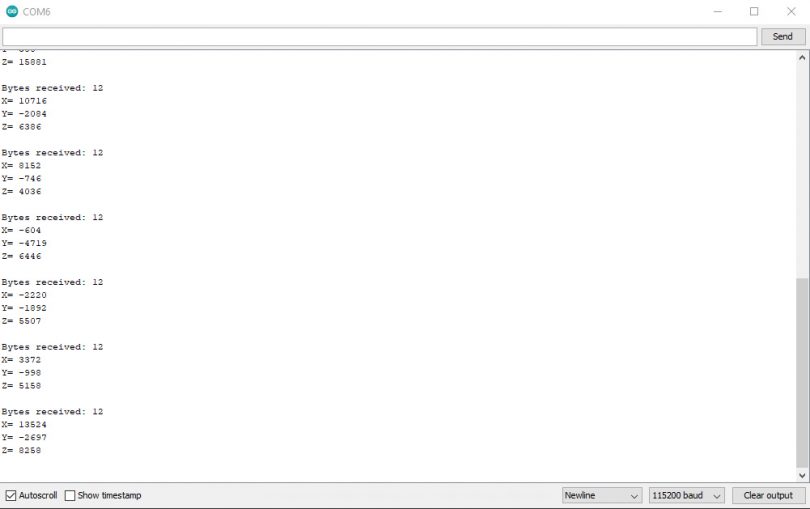
#include <ESP8266WiFi.h> #include <espnow.h> typedef struct temp_struct { int x; int y; int z; } temp_struct; temp_struct myData; void OnDataRecv(uint8_t * mac, uint8_t *incomingData, uint8_t len) { memcpy(&myData, incomingData, sizeof(myData)); Serial.print("Bytes received: "); Serial.println(len); Serial.print("X= "); Serial.println(myData.x); Serial.print("Y= "); Serial.println(myData.y); Serial.print("Z= "); Serial.println(myData.z); Serial.println(); } void setup() { Serial.begin(115200); WiFi.mode(WIFI_STA); if (esp_now_init() != 0) { Serial.println("Error initializing ESP-NOW"); return; } esp_now_set_self_role(ESP_NOW_ROLE_SLAVE); esp_now_register_recv_cb(OnDataRecv); } void loop() { } |
Conclusion
In this project, using the ESP-NOW protocol, we received and analyzed the values of an MPU6050 module at the desired destination, which in this scenario was an ESP32, and then sent it wirelessly to the destination, ie Wemos backboard with ESP8266 chip, and in serial We showed the monitor.
If you encounter any problems in the process of launching and carrying out this project, do not hesitate to ask your question at the end of this post. I will answer your problem as soon as possible. Also, if there is a problem in the code or the execution steps, you can inform in this way.