
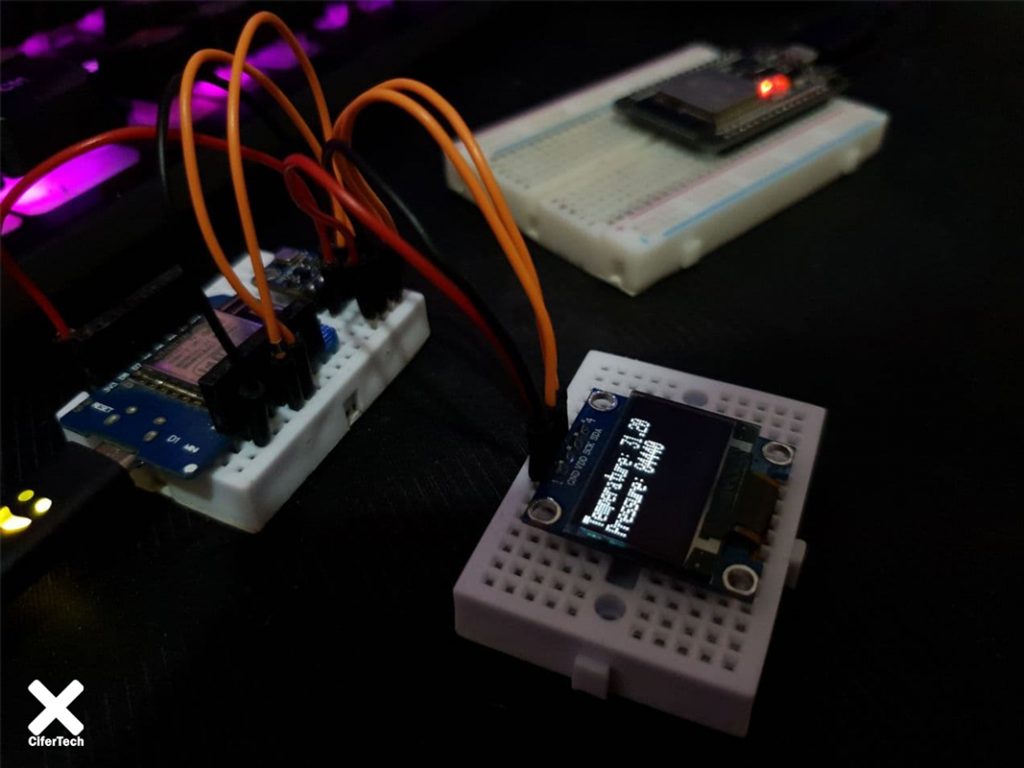
In various projects, we tested the data transfer between ESP boards, but in this tutorial, we intend to test the design of the MESH mesh network along with the data exchange of the opposite sensors. In fact, using this type of connection, all ESP boards in the network They will exchange data with each other and if there is data, values will be received in all nodes. Also in this project, we have placed an OLED display in one of the nodes that uses the BMP180 temperature and pressure sensor to measure the ambient values to make it easier to display the values instantly in the source node. Visit CiferTech for more tutorials, and be sure to follow my Instagram page to support me. ^-^
ESP-MESH network
ESP-MESH differs from traditional Wi-Fi network infrastructure in that it does not require a central node to connect the nodes. Instead, nodes are allowed to connect to neighboring nodes. The nodes are reciprocally responsible for resetting each other. This allows an ESP-MESH network to have more coverage area because the nodes can still be connected without having to be in the center node. Similarly, ESP-MESH is less prone to load because the number of nodes allowed in the network is no longer limited by one central node.
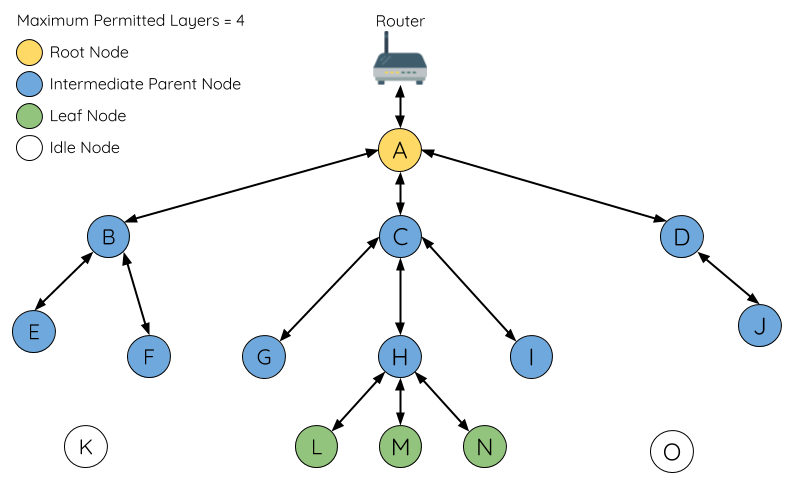
ESP-MESH is built on a higher level than the Wi-Fi protocol and can be considered as a network protocol that combines many Wi-Fi networks into a single WLAN. In Wi-Fi, stations or STAs are restricted to a single connection to one AP at a time, while an AP can connect to multiple STAs simultaneously. However ESP-MESH allows nodes to act as both a station and an AP. Thus, a node in ESP-MESH can have multiple downstream connections using its softAP interface, while having a single upstream connection using its STA interface at the same time. This naturally leads to a tree network topology with a multi-layered parent-child hierarchy.
ESP32 board
ESP32 is the advanced generation of ESP8266 . One of the differences is its built-in Bluetooth. It also has a 2.4 GHz WiFi core and built-in Bluetooth with TSMC 40-nanometer technology . This module has the best performance in energy consumption, that is, it brings the best results for us with the least energy consumption. If we want to take a closer look at this board, we must say that this is a chip in which the NodeMCU platform is implemented, which is also called System on a chip microcontrollers.
Wemos
Wemos board is one of the most popular boards used in the field of iot, one of the advantages of this board compared to boards such as Node MCU is its small size. The Wi-Fi chip used in this board is ESP8266. Another advantage of this board is the existence of different shields for this board, which makes any project very easy and enjoyable for the user, shields such as battery shield, multi sensor, DHT22, relay, oled, a large number The shield has been developed for this board, which will leave you with a good iot experience.
Project working method
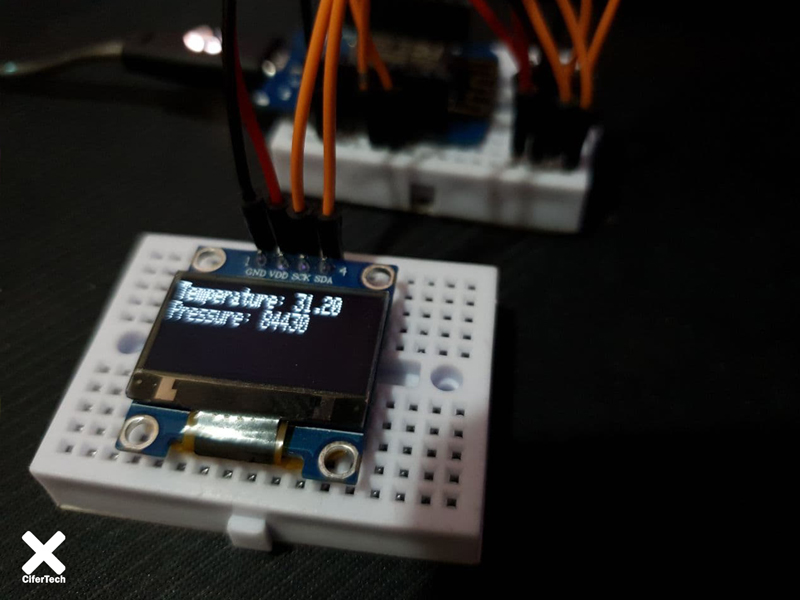
In the MESH network design project, one of the nodes reads the temperature and pressure values using the BMP180 sensor, and in the meantime, shares the values created in the Mesh network for the other node. Other nodes in the Mesh network will then receive and display these values, which will also be displayed in the sending node by the OLED display. In this project, we will be able to create a large number of nodes with similar applications. In fact, it is possible to create up to 1000 nodes, and we only need to enter a specific node number for each node.
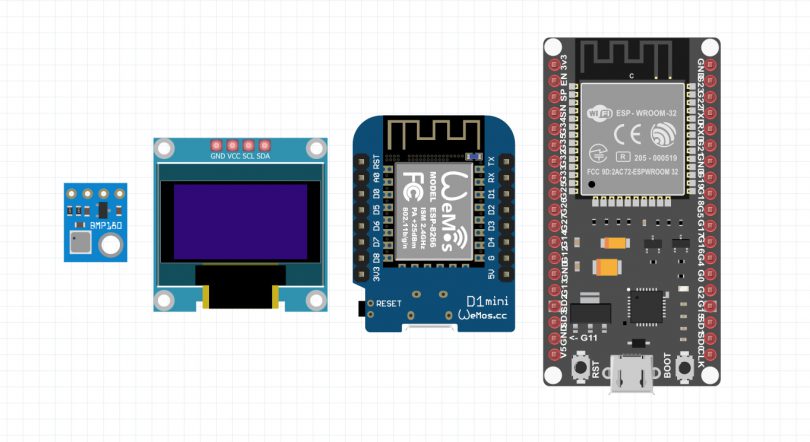
Items needed
- Nodemcu board based on ESP8266
- ESP32 board
- Oled display
- BMP180 sensor
Library installation
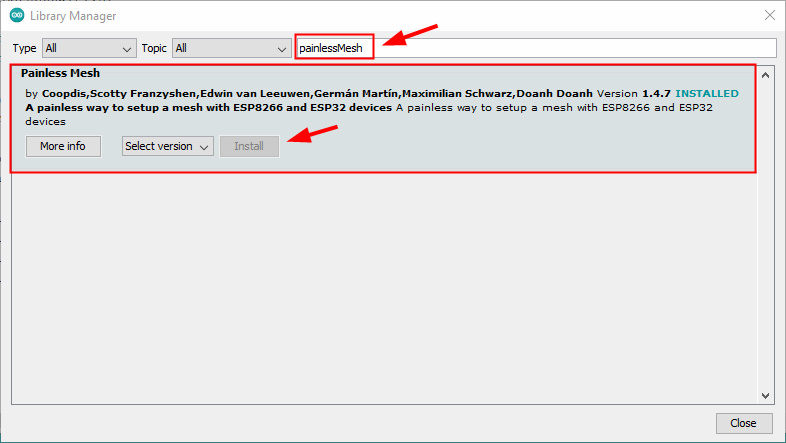
To design the MESH network, we need the painlessMesh library, which is a temporary, one-of-a-kind network. This means that no central controller or node or router is required. Each system is organized from one or more nodes on its own, in a fully functional network. The maximum mesh size is limited by the amount of memory in the mass that can be allocated to the sub-buffer. Follow the steps below to install the library. This library requires a number of default items that are library dependencies. When you install the library, a new window will appear asking you to install the required items. In this window, select the “install all” option.
- Follow this path Sketch > Include Library > Manage Libraries
- Search for the word painlessMesh.
- Install the library.
Schematics and connections
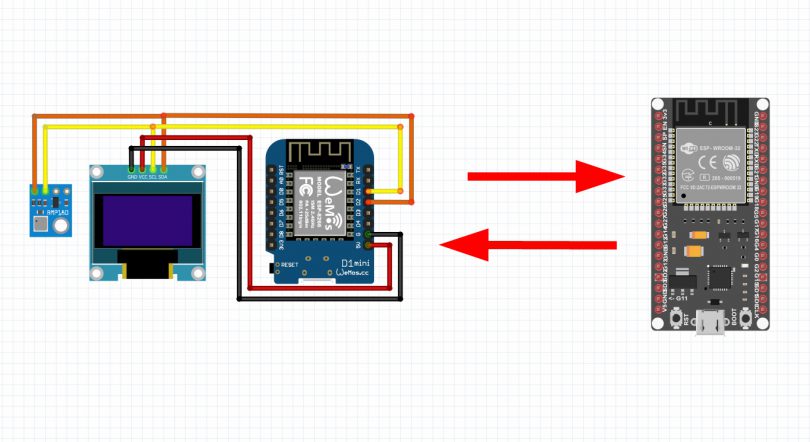
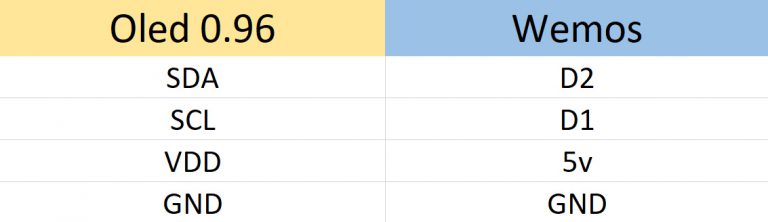
In this project, we used two components, namely the OLED display and the BMP180 sensor, both of which use the i2c interface, and thanks to this interface, we will be able to control each component with only two SCL pins and the ESDA board ESP8266. On the Wemos and Nodemcu boards, which are based on the ESP82666 chip, these dopins are available via pins D1 and D2.
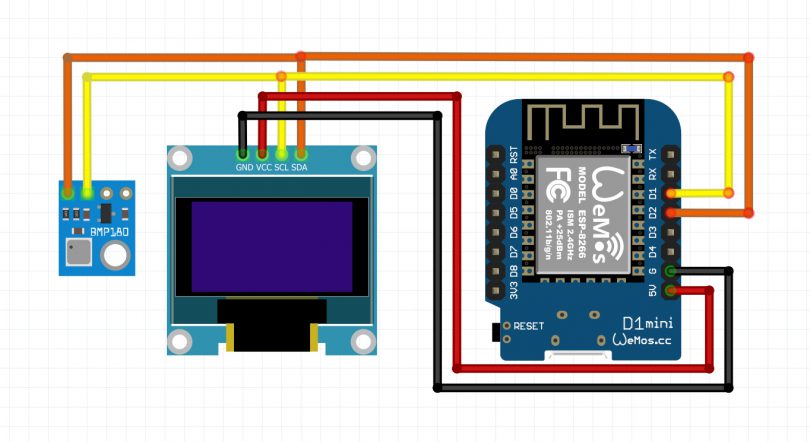
- In the first step, we will establish the BMP180 sensor connections with the Wemos board. The SCl and SDA pins will be connected to pins D1 and D2 on the Wemos board, and we will also use 5v and GND for power.
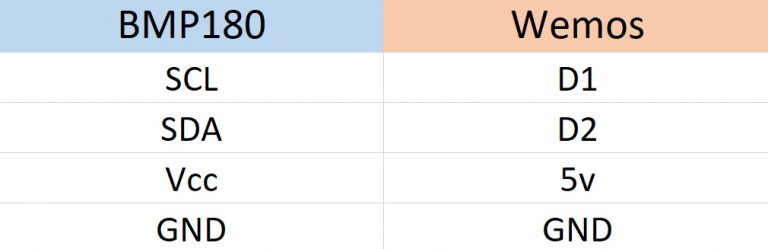
- Next, we will make the oled display connections, which, like the BMP180 sensor, will be connected to pins D1 and D2, as each device supports the i2c interface.
Finally the connections end like this, make sure the connections are correct.
Code and circuit startup
In the MESH network design project, we will use two codes for different nodes, one of which will analyze the sensor values and display in Oled as well as in the Mesh network, and the other will only receive these values and send a message . To get the values alone, you can use the code used in the previous project from the ESP-MESH series. Keep this in mind if nodes with more than one node analyze the data and type Are numbered like this project you have to customize the node number value in each code in the related codes.
- In these three lines, a name and password are provided for your mesh network so that they do not interfere with the other node, also the port used in this case is related to tcp / udp.
|
1 2 3 |
#define MESH_PREFIX "Cifer" #define MESH_PASSWORD "DogeCoin" #define MESH_PORT 5555 |
- In this line we have to change the value of node number if there are similar nodes.
|
1 |
int nodeNumber = 3; |
See the complete code of this project from this section.
|
1 2 3 4 5 6 7 8 9 10 11 12 13 14 15 16 17 18 19 20 21 22 23 24 25 26 27 28 29 30 31 32 33 34 35 36 37 38 39 40 41 42 43 44 45 46 47 48 49 50 51 52 53 54 55 56 57 58 59 60 61 62 63 64 65 66 67 68 69 70 71 72 73 74 75 76 77 78 79 80 81 82 83 84 85 86 87 88 89 90 91 92 93 94 95 96 97 98 99 100 101 102 103 104 105 106 107 108 109 110 111 112 113 114 115 116 117 118 119 120 121 122 123 124 125 126 127 128 129 130 131 132 133 134 135 136 137 138 |
#include <Adafruit_BMP085.h> #include <Adafruit_Sensor.h> #include "painlessMesh.h" #include <Arduino_JSON.h> #include <SPI.h> #include <Wire.h> #include <Adafruit_GFX.h> #include <Adafruit_SSD1306.h> Adafruit_SSD1306 display = Adafruit_SSD1306(128, 32, &Wire); #define MESH_PREFIX "Cifer" #define MESH_PASSWORD "DogeCoin" #define MESH_PORT 5555 Adafruit_BMP085 bmp; int nodeNumber = 3; String readings; Scheduler userScheduler; painlessMesh mesh; void sendMessage(); String getReadings(); Task taskSendMessage(TASK_SECOND * 5, TASK_FOREVER, &sendMessage); String getReadings() { JSONVar jsonReadings; jsonReadings["node"] = nodeNumber; jsonReadings["temp"] = bmp.readTemperature(); jsonReadings["pres"] = bmp.readPressure() / 100.0F; readings = JSON.stringify(jsonReadings); return readings; } void sendMessage() { String msg = getReadings(); mesh.sendBroadcast(msg); } void initBMP() { if (!bmp.begin(0x76)) { Serial.println("Could not find a valid BMP280 sensor, check wiring!"); while (1); } } void receivedCallback(uint32_t from, String& msg) { Serial.printf("Received from %u msg=%s\n", from, msg.c_str()); JSONVar myObject = JSON.parse(msg.c_str()); int node = myObject["node"]; double temp = myObject["temp"]; double hum = myObject["hum"]; double pres = myObject["pres"]; Serial.print("Node: "); Serial.println(node); Serial.print("Temperature: "); Serial.print(temp); Serial.println(" C"); Serial.print("Pressure: "); Serial.print(pres); Serial.println(" hpa"); } void newConnectionCallback(uint32_t nodeId) { Serial.printf("New Connection, nodeId = %u\n", nodeId); } void changedConnectionCallback() { Serial.printf("Changed connections\n"); } void nodeTimeAdjustedCallback(int32_t offset) { Serial.printf("Adjusted time %u. Offset = %d\n", mesh.getNodeTime(), offset); } void setup() { Serial.begin(115200); display.begin(SSD1306_SWITCHCAPVCC, 0x3C); initBMP(); display.clearDisplay(); display.display(); mesh.setDebugMsgTypes(ERROR | STARTUP); mesh.init(MESH_PREFIX, MESH_PASSWORD, &userScheduler, MESH_PORT); mesh.onReceive(&receivedCallback); mesh.onNewConnection(&newConnectionCallback); mesh.onChangedConnections(&changedConnectionCallback); mesh.onNodeTimeAdjusted(&nodeTimeAdjustedCallback); userScheduler.addTask(taskSendMessage); taskSendMessage.enable(); } void loop() { display.setTextSize(1); display.setTextColor(SSD1306_WHITE); display.setCursor(0, 0); display.print("Temperature: "); display.println(bmp.readTemperature()); display.print("Pressure: "); display.println(bmp.readPressure()); display.setCursor(0, 0); display.display(); display.clearDisplay(); delay(100); mesh.update(); } |
Conclusion
In the MESH network design project, we received temperature and pressure data values through the BMP180 sensor, and then set up a mesh network between the ESP boards using ESP boards, which in a series of nodes, the code used in this The project was used to analyze the values in this way, display them in the OLED display and then upload them to the created mesh network, or use a simple code to get only the desired values.