
Have you ever wanted to install CCTV cameras for your room or workplace so that you can monitor your surroundings live? Fortunately, with the help of ESP32 technology and finally the ESP32-CAM module, you can easily do this. So, with energy and a few minutes of reading, you will understand how to implement this project. This is possible only by using a simple module. Well, until this part where the purpose of this tutorial is clear, let’s have a little exchange of information about the main components of this module, so we will start with ESP32 or the heart of this module. Visit CiferTech for more tutorials, and be sure to follow my Instagram page to support me.

ESP32-CAM
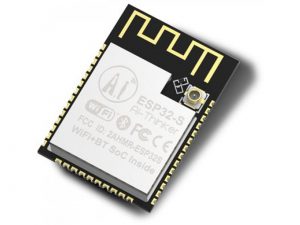
ESP32 is the advanced generation of ESP8266. One of its differences is its internal Bluetooth. It also has a 2.4 GHz Wi-Fi core and built-in Bluetooth manufactured with TSMC’s 40 nm technology. This module has the best performance in energy consumption, which means it brings the best results for us with the lowest energy consumption. If we want to look more closely at this board, we must say that this is a chip in which the NodeMCU platform is implemented, and these types of chips are also called System on a chip microcontroller.
Other features of the ESP32-cam module include the OV2640 camera with the ability to record images in JPEG, BMP, and grayscale formats. You will also be able to take pictures in dark places with the LED flash assembled on this module. One of the practical features of this module is the micro SD input with the ability to expand up to 4GB, which allows the user to save images.
Setting up ESP32-cam
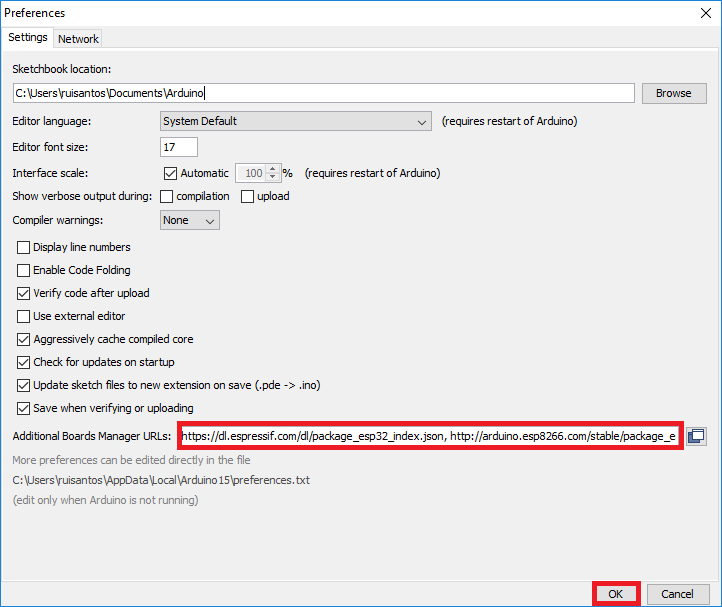
To start, the library related to this module must be installed in the Arduino IDE software. First, the following link should be copied and pasted in File > Preferences.
|
1 |
https://dl.espressif.com/dl/package_esp32_index.json, http://arduino.esp8266.com/stable/package_esp8266com_index.json |
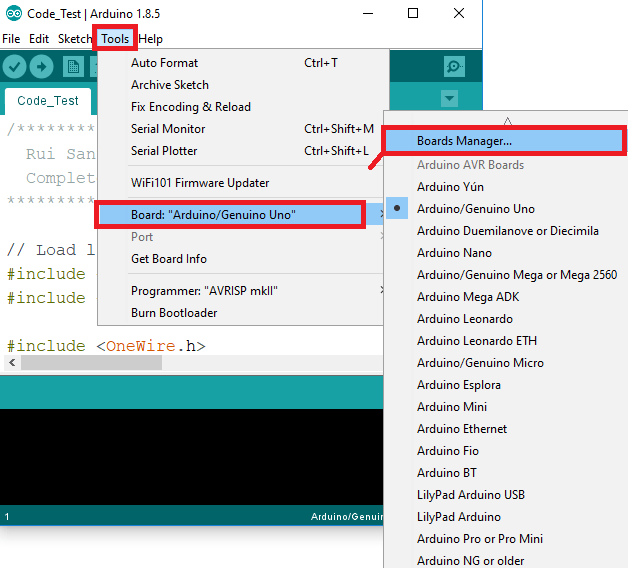
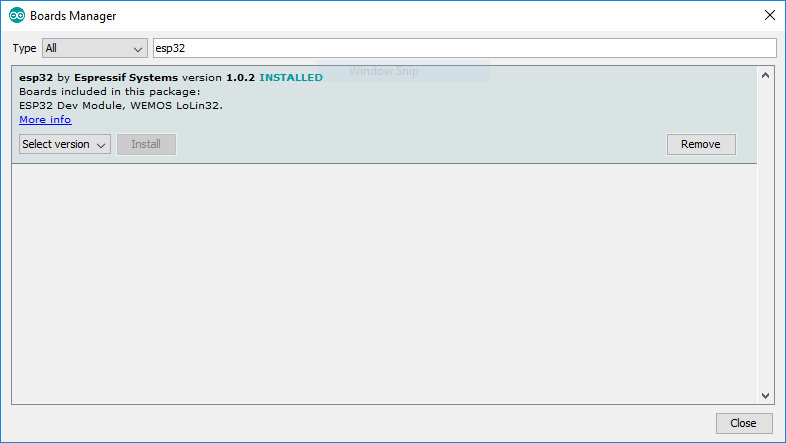
Then you will be able to download the relevant library by visiting the board’s section in Tools > Board > Boards Manager and searching for ESP32.
Next, you can find the codes related to this module in File > Examples > ESP32 > Camera. The CameraWebServer example is related to this tutorial.

Before uploading the code in the module, we must specify the network settings:
|
1 2 |
;"ssid" = const char* ssid ;"pass"= const char* password |
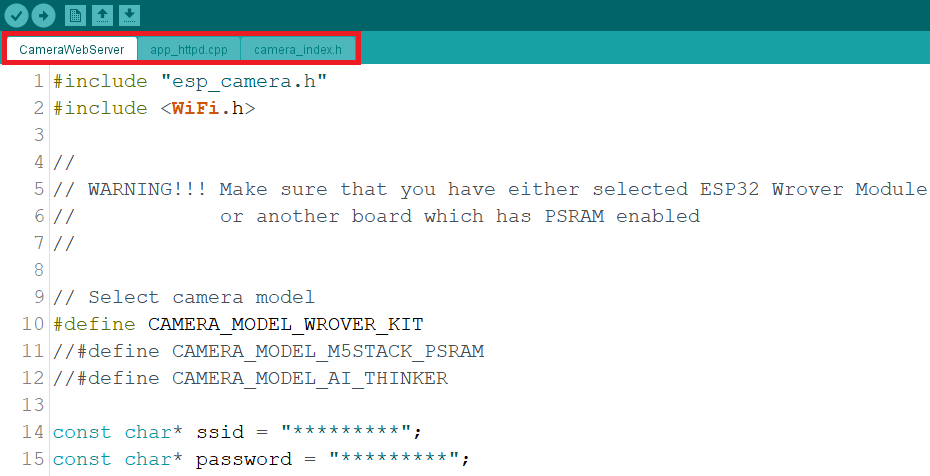
At this stage, specify the model of your module among other models that are available in the code with the command and that command.
|
1 |
define CAMERA_MODEL_AI_THINKER# |
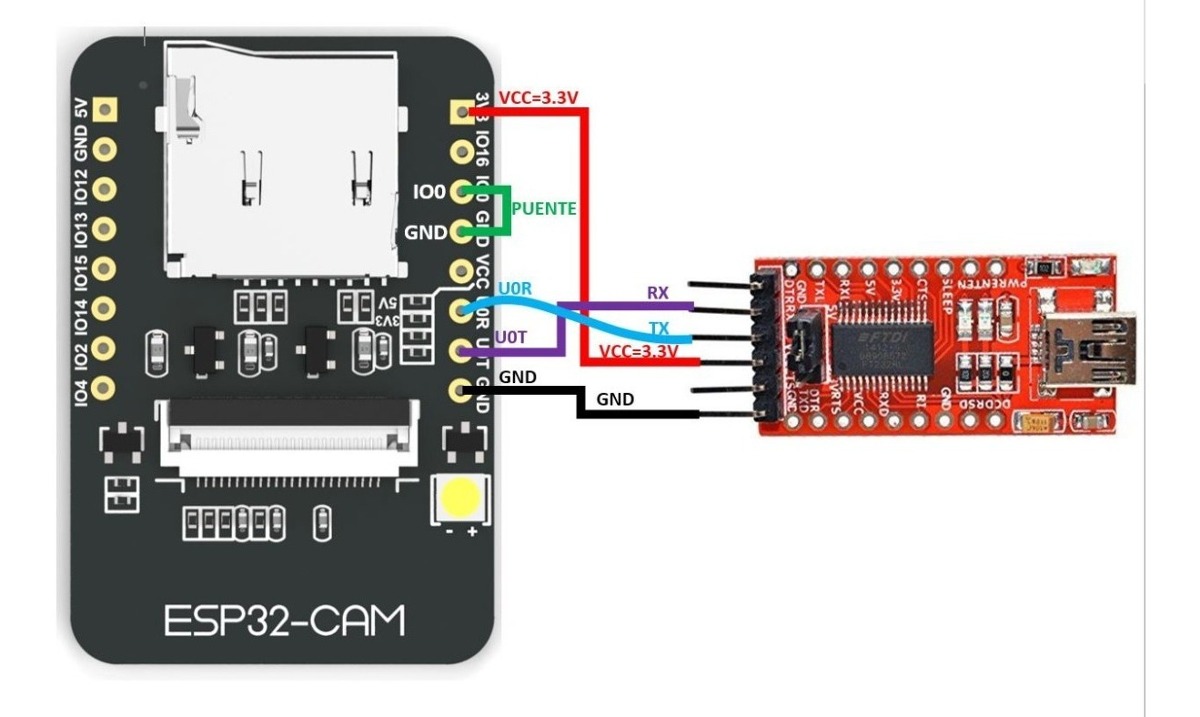
Now it’s time to program the module, we need an FTDI programmer to program the codes in the Arduino IDE on the module, make the connections as shown in the picture below, be careful that the GPIO pin 0 must be connected to GND for the program to work Will happen.
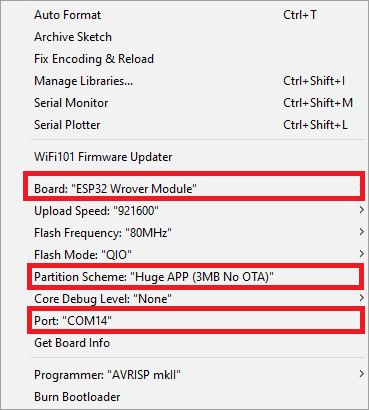
Match the items selected in the image with your software from the Tools menu.
After the code is uploaded, disconnect the GPIO pin 0 that you connected to GND before. Then open the serial monitor in the Arduino software and set the band rate to 115200, then press the RESET button on the module.
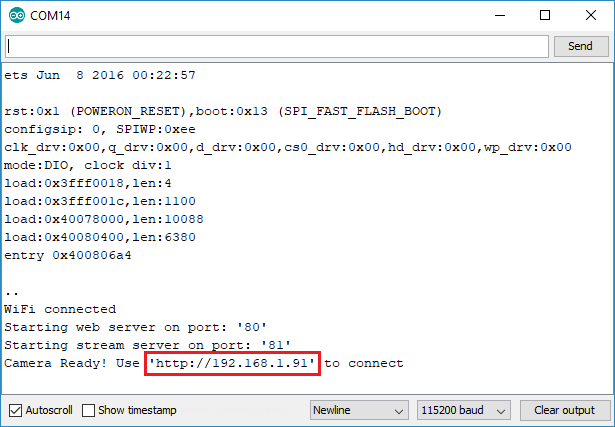
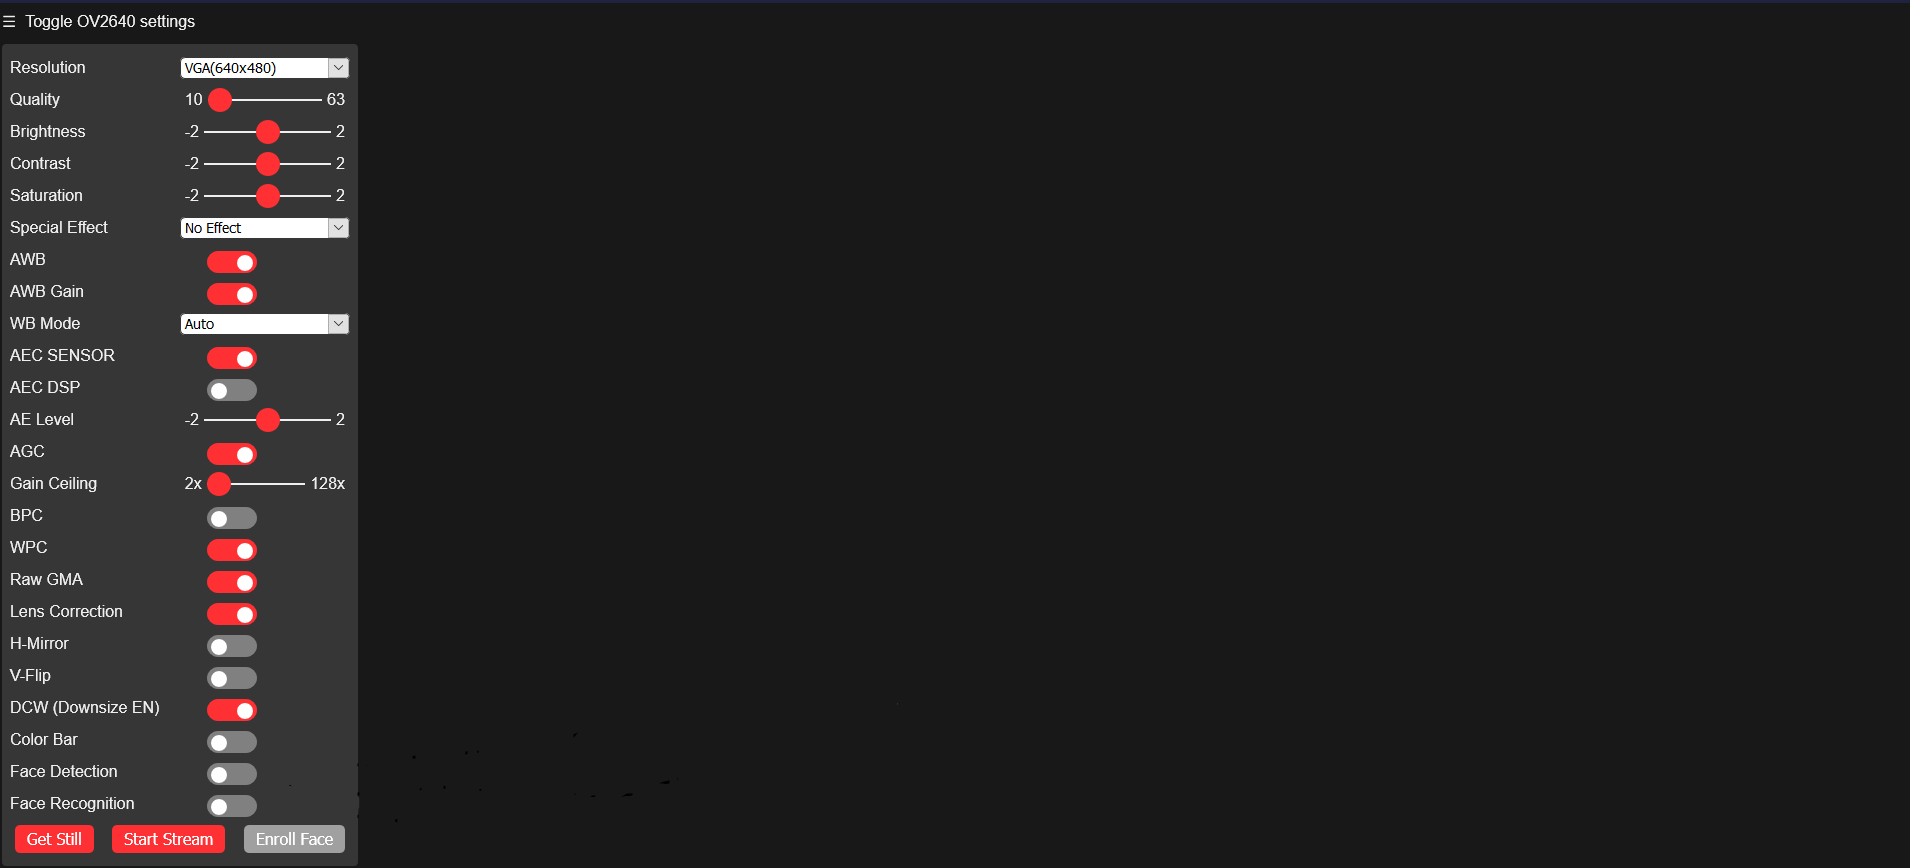
As you can see, the software gives you an IP address that you can activate the camera by searching for this IP in your browser.
Components
- ESP32-CAM
- FTDI programmer
Code
Copy the following codes and paste them into the Arduino IDE. Then upload it to the Arduino board.
|
1 2 3 4 5 6 7 8 9 10 11 12 13 14 15 16 17 18 19 20 21 22 23 24 25 26 27 28 29 30 31 32 33 34 35 36 37 38 39 40 41 42 43 44 45 46 47 48 49 50 51 52 53 54 55 56 57 58 59 60 61 62 63 64 65 66 67 68 69 70 71 72 73 74 75 76 77 78 79 80 81 82 83 84 85 86 87 88 89 90 |
#include "esp_camera.h" #include // // WARNING!!! Make sure that you have either selected ESP32 Wrover Module, // or another board which has PSRAM enabled // // Select camera model //#define CAMERA_MODEL_WROVER_KIT //#define CAMERA_MODEL_ESP_EYE //#define CAMERA_MODEL_M5STACK_PSRAM //#define CAMERA_MODEL_M5STACK_WIDE #define CAMERA_MODEL_AI_THINKER #include "camera_pins.h" const char* ssid = "PM.GOHARIAN"; const char* password = "*******"; void startCameraServer(); void setup() { Serial.begin(115200); Serial.setDebugOutput(true); Serial.println(); camera_config_t config; config.ledc_channel = LEDC_CHANNEL_0; config.ledc_timer = LEDC_TIMER_0; config.pin_d0 = Y2_GPIO_NUM; config.pin_d1 = Y3_GPIO_NUM; config.pin_d2 = Y4_GPIO_NUM; config.pin_d3 = Y5_GPIO_NUM; config.pin_d4 = Y6_GPIO_NUM; config.pin_d5 = Y7_GPIO_NUM; config.pin_d6 = Y8_GPIO_NUM; config.pin_d7 = Y9_GPIO_NUM; config.pin_xclk = XCLK_GPIO_NUM; config.pin_pclk = PCLK_GPIO_NUM; config.pin_vsync = VSYNC_GPIO_NUM; config.pin_href = HREF_GPIO_NUM; config.pin_sscb_sda = SIOD_GPIO_NUM; config.pin_sscb_scl = SIOC_GPIO_NUM; config.pin_pwdn = PWDN_GPIO_NUM; config.pin_reset = RESET_GPIO_NUM; config.xclk_freq_hz = 20000000; config.pixel_format = PIXFORMAT_JPEG; //init with high specs to pre-allocate larger buffers if(psramFound()){ config.frame_size = FRAMESIZE_UXGA; config.jpeg_quality = 10; config.fb_count = 2; } else { config.frame_size = FRAMESIZE_SVGA; config.jpeg_quality = 12; config.fb_count = 1; } #if defined(CAMERA_MODEL_ESP_EYE) pinMode(13, INPUT_PULLUP); pinMode(14, INPUT_PULLUP); #endif // camera init esp_err_t err = esp_camera_init(&config); if (err != ESP_OK) { Serial.printf("Camera init failed with error 0x%x", err); return; } sensor_t * s = esp_camera_sensor_get(); //initial sensors are flipped vertically and colors are a bit saturated if (s->id.PID == OV3660_PID) { s->set_vflip(s, 1);//flip it back s->set_brightness(s, 1);//up the blightness just a bit s->set_saturation(s, -2);//lower the saturation } //drop down frame size for higher initial frame rate s->set_framesize(s, FRAMESIZE_QVGA); #if defined(CAMERA_MODEL_M5STACK_WIDE) s->set_vflip(s, 1); s->set_hmirror(s, 1); #endif WiFi.begin(ssid, password); while (WiFi.status() != WL_CONNECTED) { delay(500); Serial.print("."); } Serial.println(""); Serial.println("WiFi connected"); startCameraServer(); Serial.print("Camera Ready! Use 'http://"); Serial.print(WiFi.localIP()); Serial.println("' to connect"); } void loop() { // put your main code here, to run repeatedly: delay(10000); } |