
Python is a high-level programming language. In recent years, it has attracted the attention of many developers. When we plan to program microcontrollers with Python language, Python is not recommended due to the processing power and processing speed of other programming languages. But with the introduction of MicroPython, which is an open-source platform from Python 3; It also includes standard libraries optimized to run on microcontrollers with limited ROM and RAM. Visit CiferTech for more tutorials, and be sure to follow my Instagram page to support me.
Micropython language is a version of Python language with a very high processing speed that can be used to communicate with microcontrollers such as ESP8266, ESP32, Wipy, pyboard, and MicroBit.
MicroPython
To date, the Python programming language has been introduced as a general purpose and powerful language, which of course it is. But in some cases, this programming language may not be the first choice for the project. For example, in the discussion of embedded software, the C language is always at the top of the table. This was the reason for the birth of the MicroPython programming language to fill the void of Python in these cases.
![]()
Differences between CPython and MicroPython
At first, for those who don’t know, Cpython3 is actually an implementation of Python version 3. One of the important differences between the two is memory management, which uses Garbage Counting instead of Reference Counting. Garbage Counting: It is a kind of memory management. This method, removes and then sorts the small pieces of memory that are used and are no longer needed.
Getting started with MicroPython
To begin, we will first examine the Pyboard board. The Pyboard is one of the most prominent development boards for MicroPython programming to date. MCU node boards are also used for this purpose. I will be using pyboard v1.1 in this series of MicroPython tutorials. In the following, I will give explanations about the features and facilities of this board. Pay attention to the board schematic.
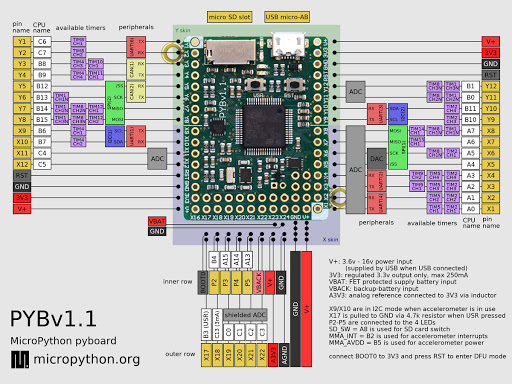
As you can see in the picture above, STM32 F4 is used in this board and it has a Cortex-F4F CPU. Also, the flash memory considered in this board is 1024kB. It has a MicroUSB input as well as a micro SD input. One of the features of the PyBoard that I must say is my favorite feature is the presence of an internal MMA7660 accelerometer. Do you remember when you were working with Arduino, you had to use a series of modules like MPU6050 or MMA7660? Now, thanks to pyboard, one will always be with you. There are two switches named USR and RST on the board. which are useful for flashing and resetting the board as well as booting the board. Four LEDs in red, green, yellow, and blue colors are placed to determine the status of the board, for example, when the board is programmed, the red LED lights up. Also, these LEDs are in the category of internal LEDs and we can activate or deactivate them in coding.
The input voltage range of the board is from 3.6 to 16 volts and the output current of the board is 250mA. It has a total of 30 IO pins, including PWM.
The first MicroPython project
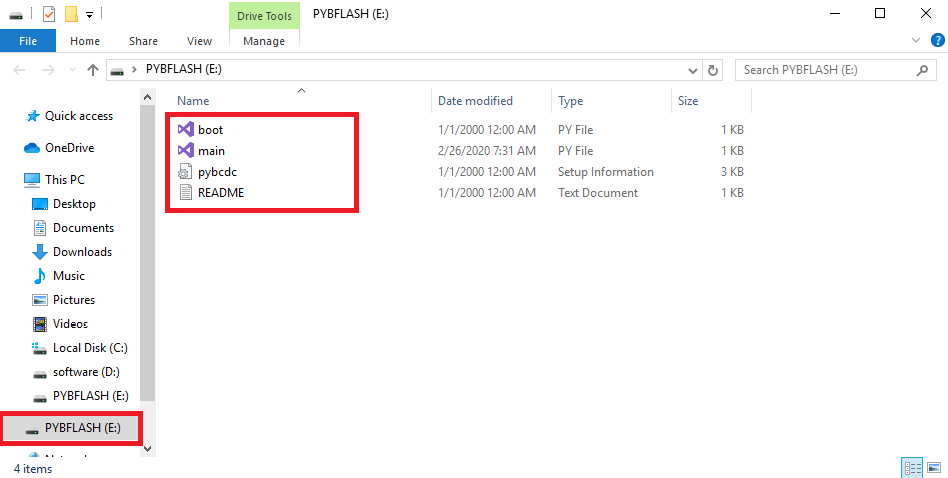
For the first project, as always, we are going to control an LED using Pyboard. To get to know how to use the board in general. In future tutorials, we will start different modules. First, after connecting the board to the laptop or … the pyBoard flash memory will be displayed for us. which has several files related to the relevant framework.
To program the board, we must use the main file. The coding will be done in this file. In this small project, we will use the X1 pin on the pyboard to apply PWM to the LED and turn it on as a result. In this way, the X1 base is connected to the anode base or the positive LED and the cathode or the negative LED to the GND of the board through a resistor. You can make connections as shown in the image below.

Items needed
- 100 Ohm resistors
- LED
- Pyboard v1.1
PyBoard MicroPython code analysis
In the first two lines, we call the desired libraries. According to the base map that you saw earlier, the X1 base is connected to channel 1 of timer 5, in the same code we create a Timer object for timer 5 and a TimerChannel1 object for channel 1.
|
1 2 3 4 5 6 |
from pyb import Timer from time import sleep tim = pyb.Timer(5, freq=100) tchannel = tim.channel(1, Timer.PWM, pin=pyb.Pin.board.X1, pulse_width=0) |
We use PWM to control the LED brightness. In this code, with a 100Hz timer, each pulse loop will last 0.01 seconds or 10ms. In the following, if we want the brightness of the LED to turn off from the start of the code and gradually turn on and increase its brightness, we use the following code.
|
1 2 3 4 5 6 7 8 9 10 11 12 13 14 15 16 17 |
max_width = 200000 min_width = 20000 wstep = 1500 cur_width = min_width while True: tchannel.pulse_width(cur_width) sleep(0.01) cur_width += wstep if cur_width > max_width: cur_width = min_width |
Now, if we want to have both situations together, what should we do? That is, the LED light will gradually increase and when it reaches the maximum state, its light will gradually decrease and finally turn off and this process will continue, for this you can use the following code.
|
1 2 3 4 5 6 7 8 9 10 11 12 13 |
while True: tchannel.pulse_width(cur_width) sleep(0.01) cur_width += wstep if cur_width > max_width: cur_width = max_width wstep *= -1 elif cur_width < min_width: cur_width = min_width wstep *= -1 |