
In the category of security products, you will see cameras known as ip cameras, which actually deliver the received images to the user through the cloud from anywhere in the world. In this tutorial, we are going to use ESP32-CAM boards and Cloud ngrok to build such a device with the ability to send images to different places without any restrictions. In fact, once the project is completed and launched, you will only be able to access it with a single link. Visit CiferTech for more tutorials, and be sure to follow my Instagram page to support me.
What is ngrok ?!
ngrok is a cross-platform application that enables developers to expose a local development server to the Internet with minimal effort. This software allows your local web server to be hosted under the ngrok.com domain, meaning that no IP or public domain name is required on the local device. Similar performance can be achieved with Reverse SSH Tunneling, but this requires more configuration as well as hosting from your remote server.
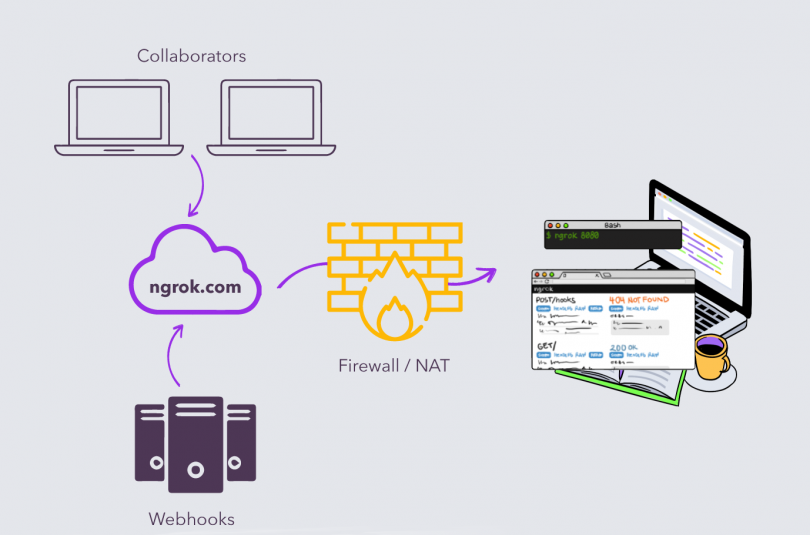
ngrok can circumvent NAT and firewall mapping restrictions by creating a TCP tunnel from a randomly created subdomain at ngrok.com (e.g. 3gf892ks.ngrok.com) to the local machine. After specifying the port that your web server is listening to, the client program starts connecting by connecting the server, and then anyone can request a unique address from their local server.
ESP-32 chip
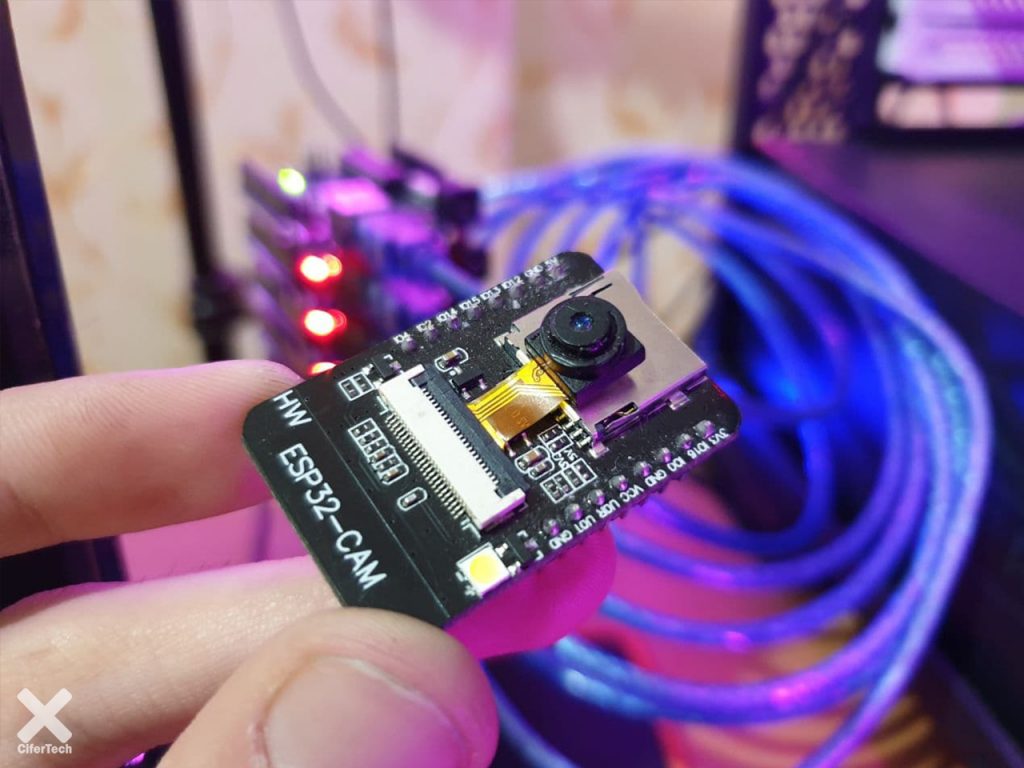
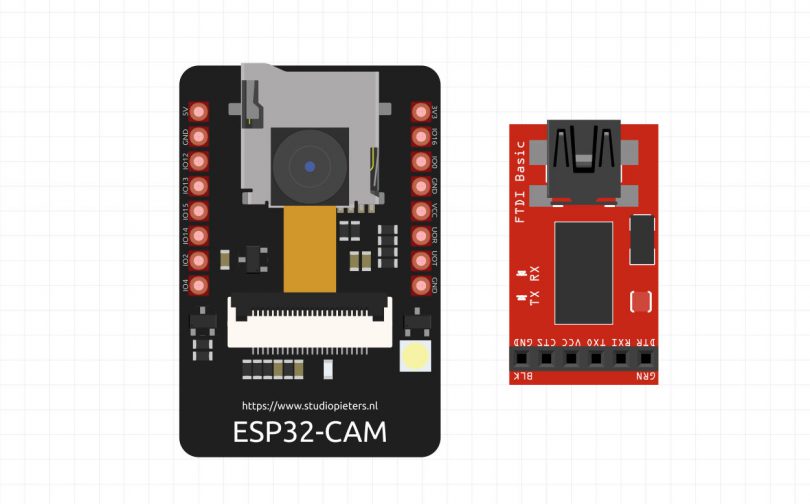
ESP32 is the advanced generation of ESP8266. One of the differences is its built-in Bluetooth. It also has a 2.4 GHz WiFi core and built-in Bluetooth with TSMC 40-nanometer technology. This module has the best performance in energy consumption, that is, it brings the best results for us with the lowest energy consumption. If we want to take a closer look at this board, we must say that this is a chip in which the NodeMCU platform is implemented, which is also called System on a chip microcontrollers. Other features of ESP32-cam module We can mention the OV2640 camera with the ability to record images in JPEG, BMP and grayscale formats. You will also be able to shoot in dark places with the LED flash mounted on this module. One of the useful features of this micro SD input module is the ability to upgrade to 4GB, which also allows the user to store images.
FTDI programmer module
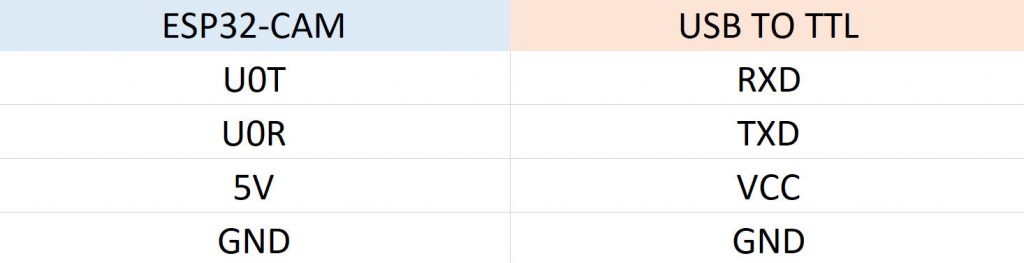
To program ESP32-cam, because the internal programmer is not included, we use this module. In fact, this module is a USB to TTL converter that uses Rx and Tx with ESP-CAM board and via USB connection to the system used. We communicate. In this module, there are two levels of 3.3 and 5 volts, which can be useful in different projects.
How the project works
This project works in such a way that by using the ngrok cloud, after registering and receiving the required code and then running the ESP32-CAM web server on the local network with the help of the ngrok cloud, the data is transferred to the cloud and received on the side We will do it again. This process is done using a cmd in your Windows machine, but of course there are other versions for the Linux machine that allow us to use Raspberry Pi to be able to run the server part of the project.
Items needed
- ESP32-CAM module
- FT232 converter module for program
Install ESP32 plugin
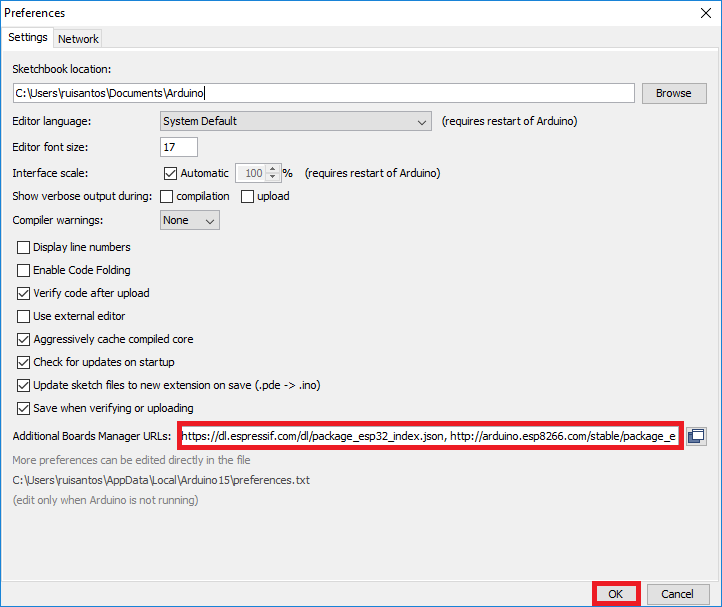
To get started, the library for this module must be installed in the Arduino IDE software. First, the following link must be copied and pasted to File > Preferences .
|
1 |
https://dl.espressif.com/dl/package_esp32_index.json, http://arduino.esp8266.com/stable/package_esp8266com_index.json |
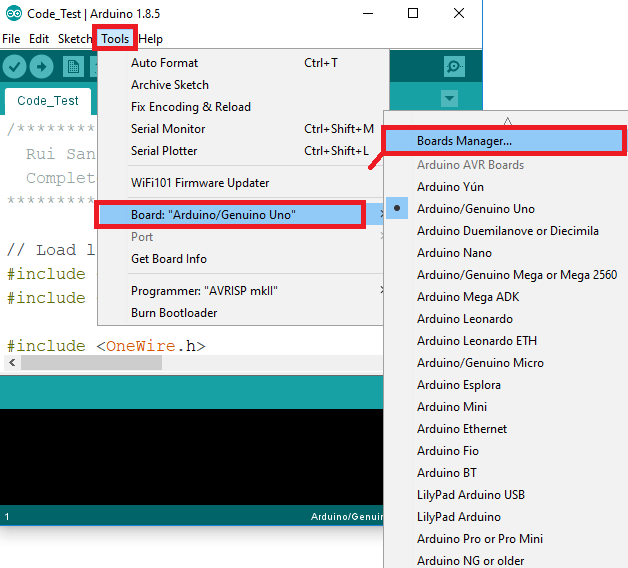
Then you will be able to download the relevant library by going to the Boards section in Tools > Board > Boards Manager and ESP32 Search.
Programming ESP32-cam
To program this board, use the following schematic and make the connections according to the following schematic according to the USB TO TTL used. Note that when programming code, ie after compiling the code, the two pins GPIO 0 and GND are connected to each other, and after successfully compiling the code, you must disconnect this connection to run the project.
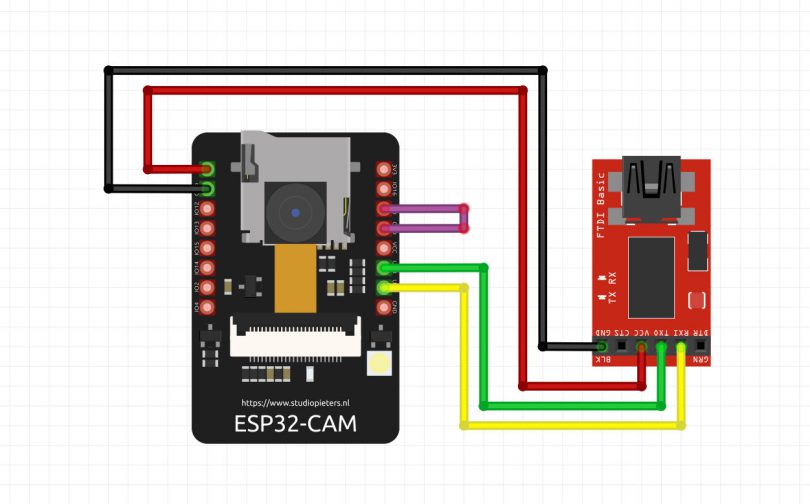
- The connections are as follows.
Ngrok SettingUp
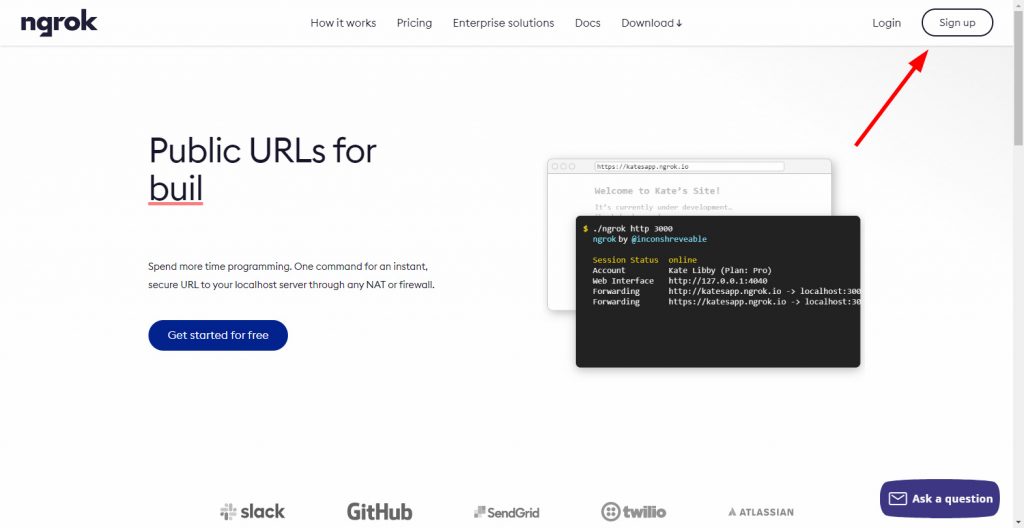
In the first step to implement this project on ngrok.com site, we will create an account. We will first enter the ngrok.com site , and using the SignUp option we will enter the page shown below.
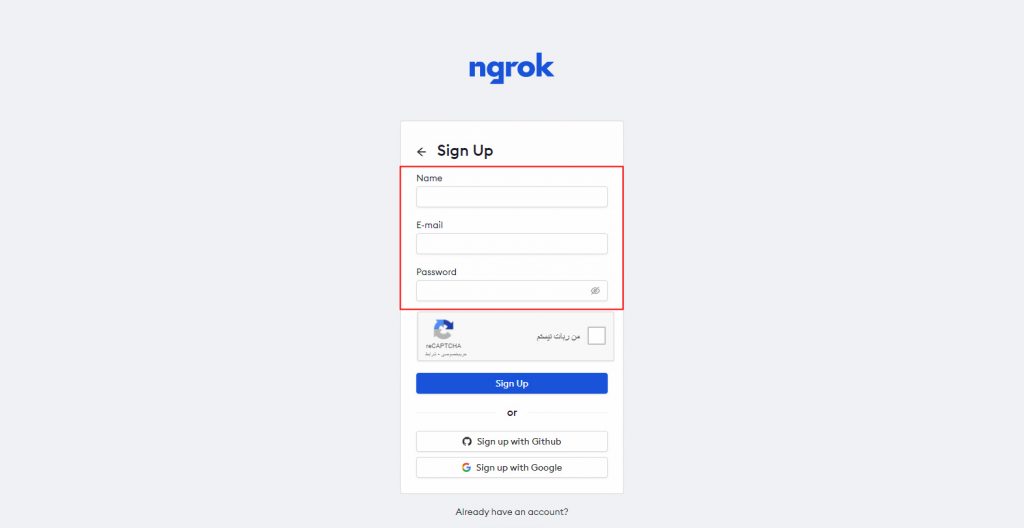
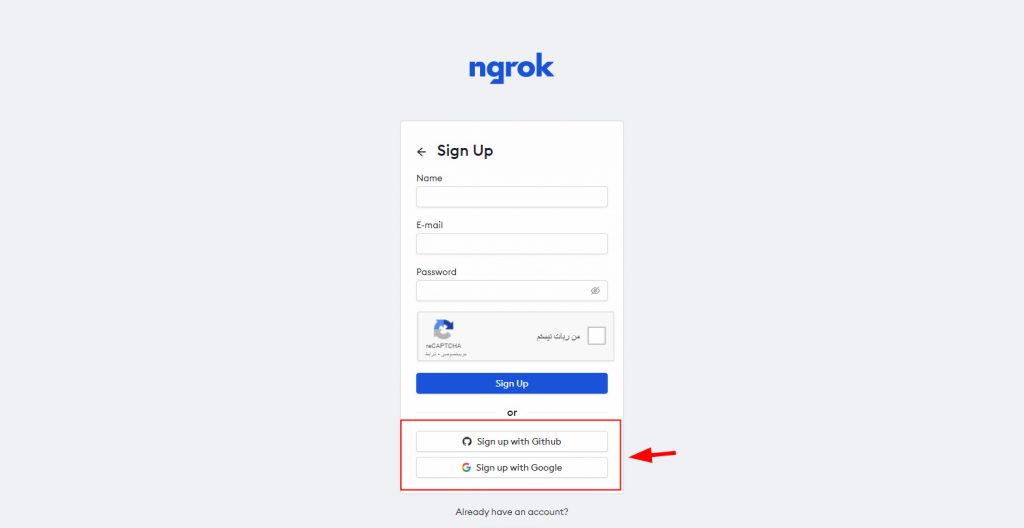
After entering this page, we can register on the site in two ways. First, using the complete information and entering it manually as shown in the image below.
In the second case, it is possible to register using a Github or Gmail account in the shortest time. In the image below, by clicking on the images related to Gmail or Github, you will be able to create an automatic account on the site thanks to these accounts that you have already created.
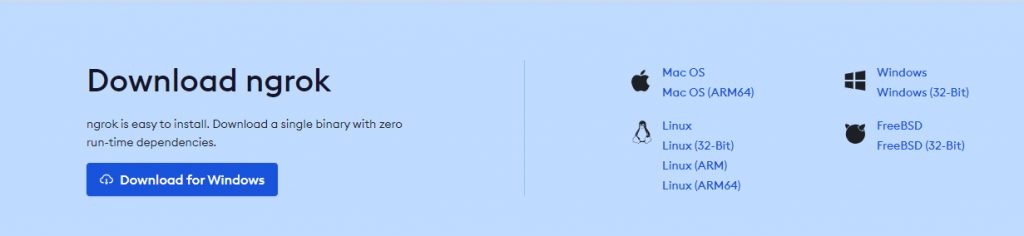
After registering on the site, you will see a window on the first page of the registration window, using which you can download the ngrok terminal for the relevant operating system.
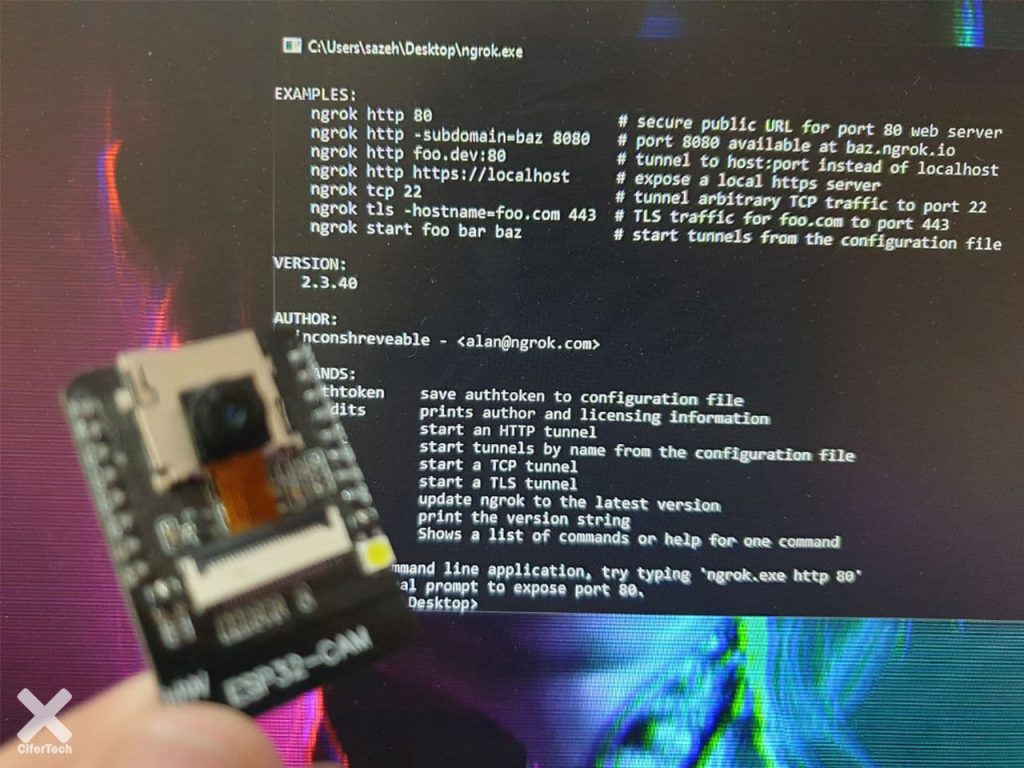
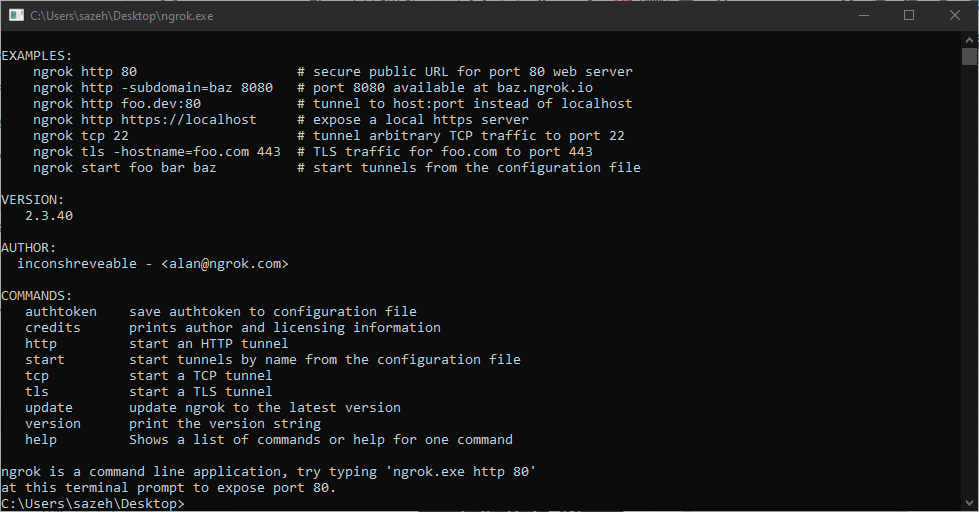
After downloading the specified file and executing it, you will encounter such an environment. In the next steps, we will review the understandable commands of this terminal.
Get IP Local
To receive a local IP from the ESP32-CAM board, we must first upload the code on the chip. The code we use for this section is a simplified example. The following code requires a few small changes, the first of which is the SSID settings and password of your modem that you must enter in the specified fields.
|
1 2 |
const char* ssid = "*********"; const char* password = "*********"; |
This code works well for Wrover / Ai Thinker chips, change it because of the configuration for the associated pins if you are using miscellaneous chips.
|
1 2 3 4 5 6 7 8 9 10 11 12 13 14 15 16 17 |
#define PWDN_GPIO_NUM 32 #define RESET_GPIO_NUM -1 #define XCLK_GPIO_NUM 0 #define SIOD_GPIO_NUM 26 #define SIOC_GPIO_NUM 27 #define Y9_GPIO_NUM 35 #define Y8_GPIO_NUM 34 #define Y7_GPIO_NUM 39 #define Y6_GPIO_NUM 36 #define Y5_GPIO_NUM 21 #define Y4_GPIO_NUM 19 #define Y3_GPIO_NUM 18 #define Y2_GPIO_NUM 5 #define VSYNC_GPIO_NUM 25 #define HREF_GPIO_NUM 23 #define PCLK_GPIO_NUM 22 |
Finally, using the existing schemas and previous tutorials, upload the code to the ESP32 chip.
|
1 2 3 4 5 6 7 8 9 10 11 12 13 14 15 16 17 18 19 20 21 22 23 24 25 26 27 28 29 30 31 32 33 34 35 36 37 38 39 40 41 42 43 44 45 46 47 48 49 50 51 52 53 54 55 56 57 58 59 60 61 62 63 64 65 66 67 68 69 70 71 72 73 74 75 76 77 78 79 80 81 82 83 84 85 86 87 88 89 90 91 92 93 94 95 96 97 98 99 100 101 102 103 104 105 106 107 108 109 110 111 112 113 114 115 116 117 118 119 120 121 122 123 124 125 126 127 128 129 130 131 132 133 134 135 136 137 138 139 140 141 142 143 144 145 146 147 148 149 150 151 152 153 154 155 156 157 158 159 |
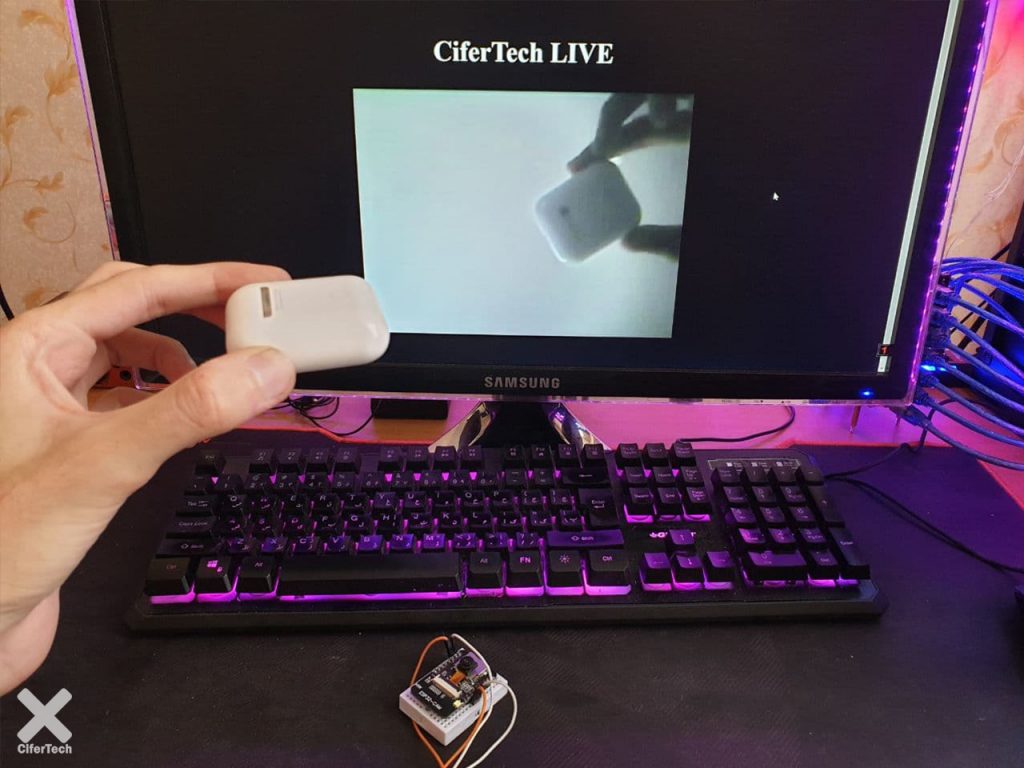
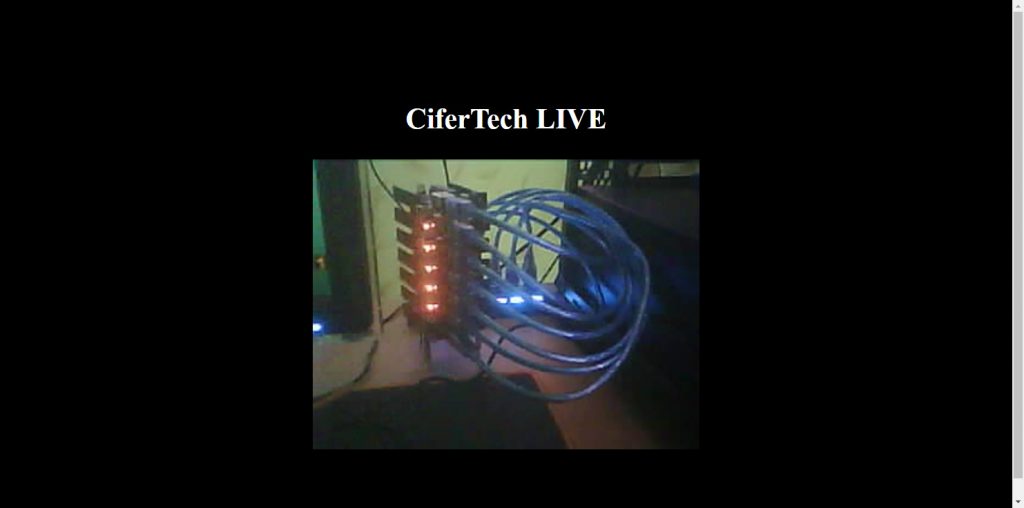
#include "esp_camera.h" #include <WiFi.h> const char* ssid = "*********"; const char* password = "*********"; #define PWDN_GPIO_NUM 32 #define RESET_GPIO_NUM -1 #define XCLK_GPIO_NUM 0 #define SIOD_GPIO_NUM 26 #define SIOC_GPIO_NUM 27 #define Y9_GPIO_NUM 35 #define Y8_GPIO_NUM 34 #define Y7_GPIO_NUM 39 #define Y6_GPIO_NUM 36 #define Y5_GPIO_NUM 21 #define Y4_GPIO_NUM 19 #define Y3_GPIO_NUM 18 #define Y2_GPIO_NUM 5 #define VSYNC_GPIO_NUM 25 #define HREF_GPIO_NUM 23 #define PCLK_GPIO_NUM 22 WiFiServer server(80); bool connected = false; WiFiClient live_client; String index_html = "<meta charset=\"utf-8\"/>\n" \ "<style>\n" \ "#content {\n" \ "display: flex;\n" \ "flex-direction: column;\n" \ "justify-content: center;\n" \ "align-items: center;\n" \ "text-align: center;\n" \ "min-height: 100vh;}\n" \ "</style>\n" \ "<body bgcolor=\"#000000\"><div id=\"content\"><h2 style=\"color:#ffffff\">CiferTech LIVE</h2><img src=\"video\"></div></body>"; void configCamera(){ camera_config_t config; config.ledc_channel = LEDC_CHANNEL_0; config.ledc_timer = LEDC_TIMER_0; config.pin_d0 = Y2_GPIO_NUM; config.pin_d1 = Y3_GPIO_NUM; config.pin_d2 = Y4_GPIO_NUM; config.pin_d3 = Y5_GPIO_NUM; config.pin_d4 = Y6_GPIO_NUM; config.pin_d5 = Y7_GPIO_NUM; config.pin_d6 = Y8_GPIO_NUM; config.pin_d7 = Y9_GPIO_NUM; config.pin_xclk = XCLK_GPIO_NUM; config.pin_pclk = PCLK_GPIO_NUM; config.pin_vsync = VSYNC_GPIO_NUM; config.pin_href = HREF_GPIO_NUM; config.pin_sscb_sda = SIOD_GPIO_NUM; config.pin_sscb_scl = SIOC_GPIO_NUM; config.pin_pwdn = PWDN_GPIO_NUM; config.pin_reset = RESET_GPIO_NUM; config.xclk_freq_hz = 20000000; config.pixel_format = PIXFORMAT_JPEG; config.frame_size = FRAMESIZE_QVGA; config.jpeg_quality = 9; config.fb_count = 1; esp_err_t err = esp_camera_init(&config); if (err != ESP_OK) { Serial.printf("Camera init failed with error 0x%x", err); return; } } //continue sending camera frame void liveCam(WiFiClient &client){ camera_fb_t * fb = esp_camera_fb_get(); if (!fb) { Serial.println("Frame buffer could not be acquired"); return; } client.print("--frame\n"); client.print("Content-Type: image/jpeg\n\n"); client.flush(); client.write(fb->buf, fb->len); client.flush(); client.print("\n"); esp_camera_fb_return(fb); } void setup() { Serial.begin(115200); WiFi.begin(ssid, password); Serial.println(""); while (WiFi.status() != WL_CONNECTED) { delay(500); Serial.print("."); } Serial.println(""); String IP = WiFi.localIP().toString(); Serial.println("IP address: " + IP); index_html.replace("server_ip", IP); server.begin(); configCamera(); } void http_resp(){ WiFiClient client = server.available(); if (client.connected()) { String req = ""; while(client.available()){ req += (char)client.read(); } Serial.println("request " + req); int addr_start = req.indexOf("GET") + strlen("GET"); int addr_end = req.indexOf("HTTP", addr_start); if (addr_start == -1 || addr_end == -1) { Serial.println("Invalid request " + req); return; } req = req.substring(addr_start, addr_end); req.trim(); Serial.println("Request: " + req); client.flush(); String s; if (req == "/") { s = "HTTP/1.1 200 OK\n"; s += "Content-Type: text/html\n\n"; s += index_html; s += "\n"; client.print(s); client.stop(); } else if (req == "/video") { live_client = client; live_client.print("HTTP/1.1 200 OK\n"); live_client.print("Content-Type: multipart/x-mixed-replace; boundary=frame\n\n"); live_client.flush(); connected = true; } else { s = "HTTP/1.1 404 Not Found\n\n"; client.print(s); client.stop(); } } } void loop() { http_resp(); if(connected == true){ liveCam(live_client); } } |
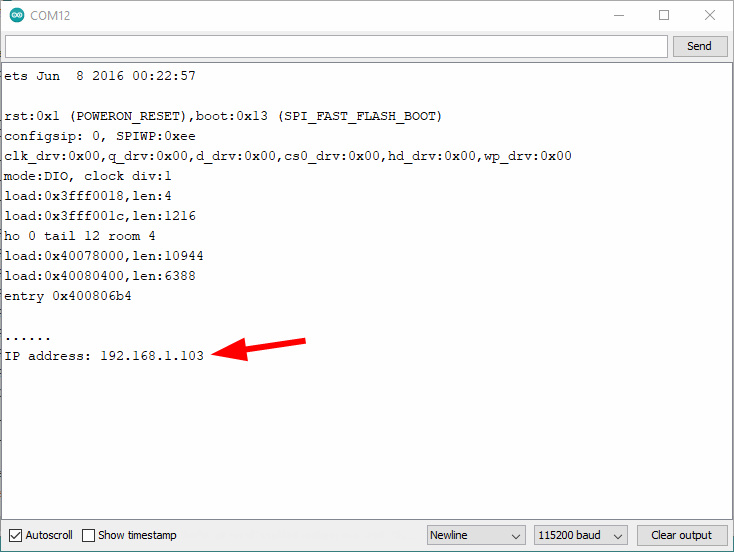
After uploading the code on the chip, by selecting the Serial Monitor option in the Arduino IDE, you will be able to get the created ip ledcal, which we will need in the next steps.
Note : If the ip is not displayed once, reset the board using the microswitch on the board.
Launch the project and transfer the images
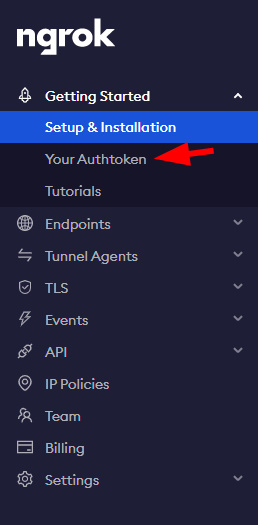
After completing the previous steps, such as uploading the code and receiving the local ip, we must go to the startup of ngrok prerequisites and send the images to the cloud using the relevant commands. First, from the left tab on the ngrok site, click on Your Authtoken option.
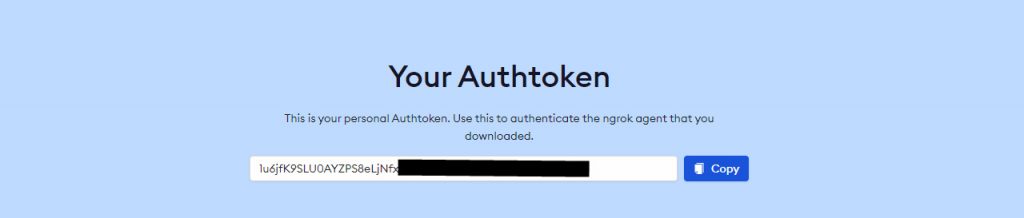
In this section, you will encounter a multi-character code that consists of a sum of several letters and numbers. This code is for your account only and should not be passed on to anyone else, in which case you can reset it from the settings.
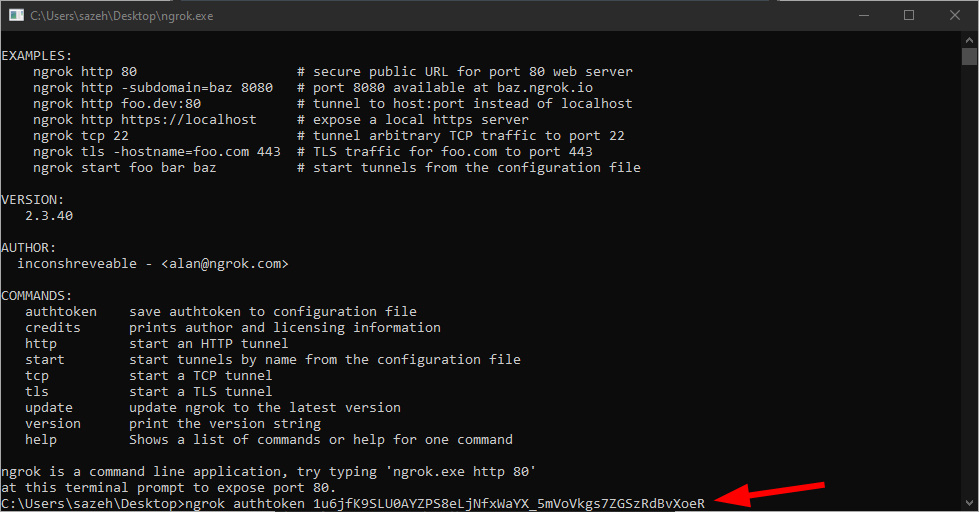
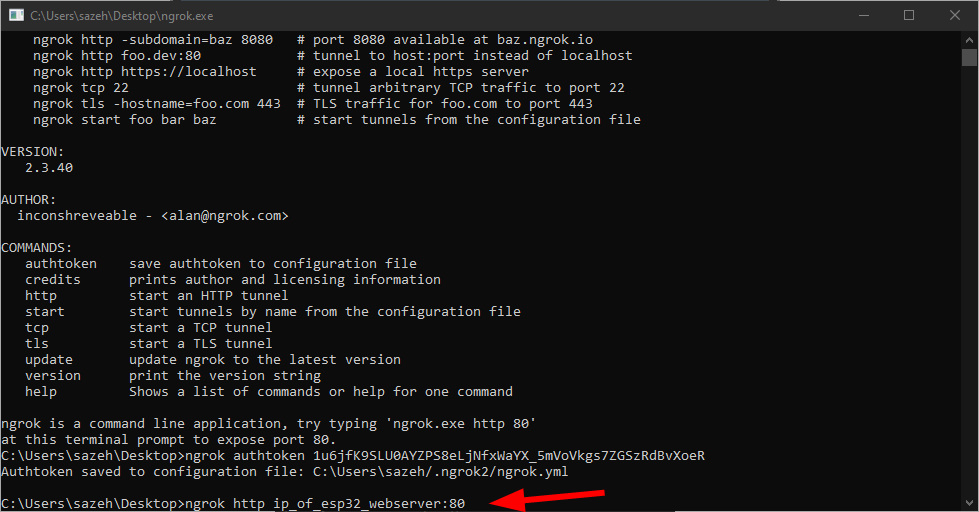
In the next step, run the terminal that we downloaded and enter the following command along with the Authtoken that you received.
Then in the next line, enter the following command with the local ip that you received, in the part that is written ip_of_esp32 then press enter.
|
1 |
ngrok http 192.168.1.103:80 |
In the following, you will encounter the following information with a new window that gives you links to access the web server via the cloud. You will be able to access your web server by searching for the link specified in the image from anywhere and with any device.
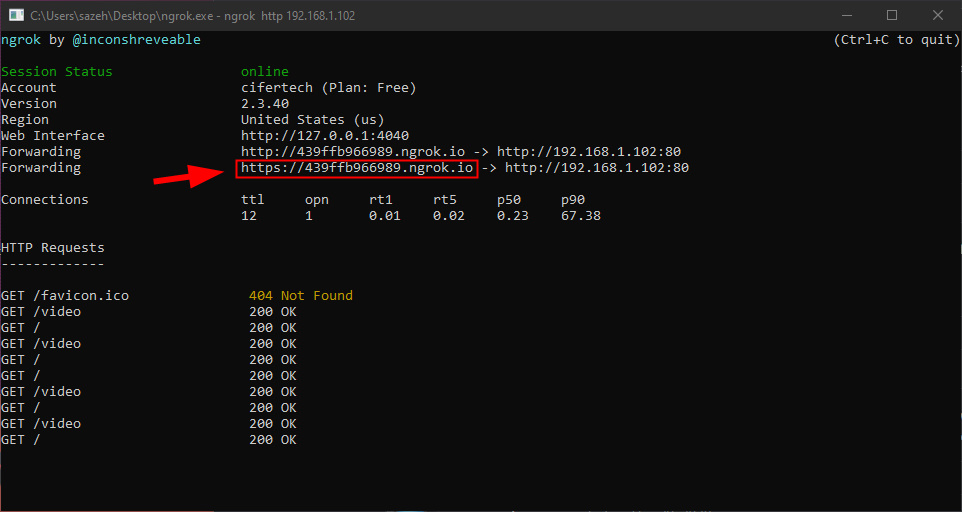
Finally, by searching for the link in the browser, you will receive the image instantly.
The last word with Cifer
In this project, as before, we created a simple web server to stream images and access it locally, and using the ngrok service, we sent the information of this web server to the cloud and received it with a specific link, which allowed us to Be able to connect to it anytime and anywhere. This project can be seen in many examples of security and surveillance products, for example security cameras known as ip cameras or child care products that provide you with a surveillance system.
If you encounter any problems during the setup and implementation of this project, do not hesitate to submit your question at the end of this post. I will answer your problem as soon as possible. Also, if there is a problem in the code or the execution steps, you can inform through this way.