

Jamming technology has become an essential part of modern-day life. It helps in protecting confidential information, detect illegal activities, and provide security to sensitive equipment. In this project, we will build a jammer in the 315MHz band, which can be controlled using the menu to change its frequency.
🌟 About the Project
The jammer operates in the 315 MHz frequency band, which is commonly used for wireless communication. With frequency control using the menu, the user can adjust the jammer’s frequency to suit their specific needs.
🎯 Features
- • Disruptor in the 315 MHz band
- • Frequency control using the menu
🧰 Getting Started
To build this project, we will need an Oled SSD1306 display, a 315MHz transmitter, and an Arduino Nano. We will also require a micro switch for user input.
- • Oled SSD1306 0.96″
- • Arduino Nano
- • 315MHz Transmitter
- • Micro Switch
🔌 Schematic
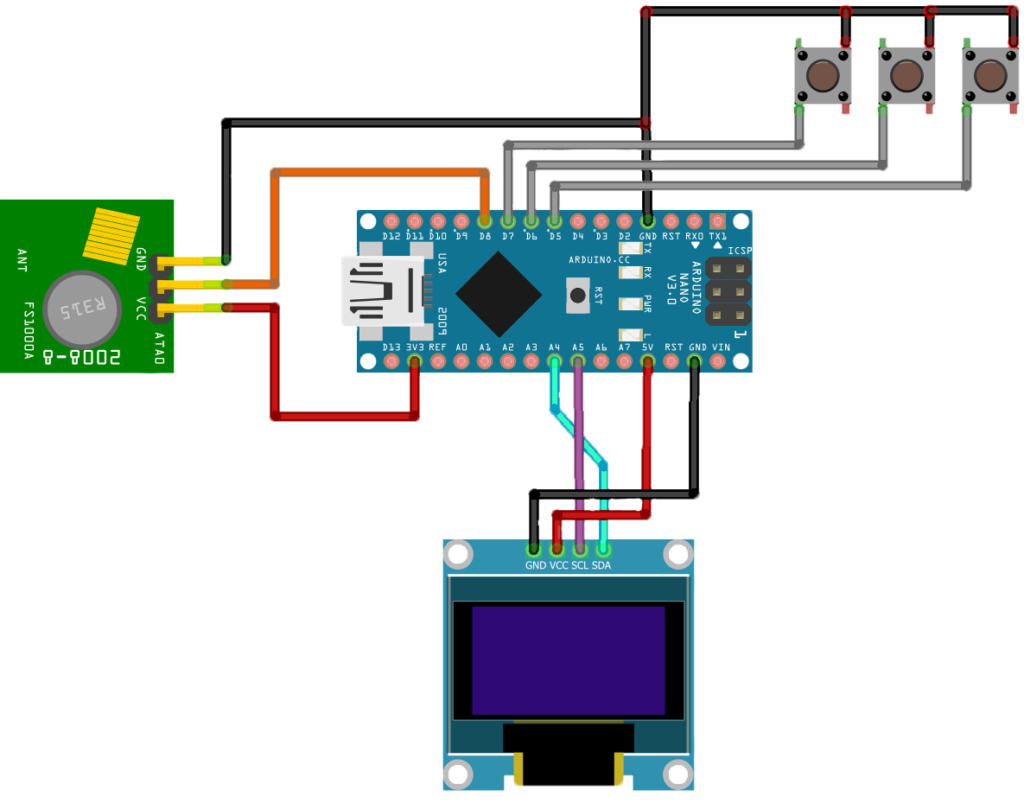
Make the connections according to the table and schematic below.
- • Arduino and 315MHz Transmitter.
| Arduino | 315MHz Transmitter |
|---|---|
| 8 | Data |
| 3v3 | VCC |
| GND | GND |
- • Arduino and OLED display.
| Arduino | OLED display |
|---|---|
| A5 | SCK |
| A4 | SDA |
| 5v | VDD |
| GND | GND |
- • Arduino and Micro Switch.
| Arduino | nRF24 |
|---|---|
| Arduino 5 | – |
| Arduino 6 | – |
| Arduino 7 | – |
- • Complete Schematic
⚙️ Installation
Before uploading the code you need to install the required library in Arduino IDE. Follow these steps:
- • Follow this path Sketch> Include Library> Manage Libraries
- • Search for Adafruit SSD1306
- • Install the library
-Then search for the “GFX” and install it also.
![]()
Code
If you’re interested in building this project on your own, the code is available on GitHub. Simply go to the GitHub repository, and download the code.
GitHub repository: github.com/cifertech/315Mhz-jammer
👀 Usage
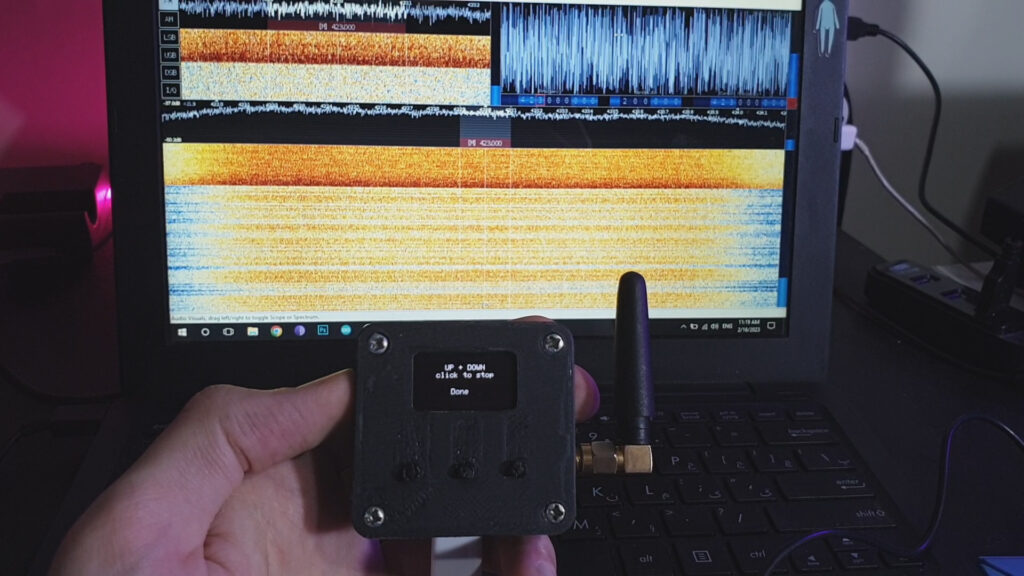
Once we have uploaded the code to the Arduino Nano, we can start using the jammer. We will begin by selecting the desired frequency from the options available in the menu. After selecting the frequency, the device will start sending a signal to the 315 MHz band. If necessary, we can stop the jammer by selecting the up and down switches simultaneously, which will return us to the menu.
Once everything is connected and the code is uploaded, we can start using the jammer. Follow these steps:
- 1. Select the desired frequency from the options in the menu.
- 2. The device will start sending a signal to the 315 MHz band.
- 3. If necessary, the jammer can be stopped by selecting the up and down switches at the same time.
- 4. You will then return to the menu.

In conclusion, we have built a jammer in the 315MHz band, which can be controlled using the menu to change its frequency. This project is useful for anyone interested in wireless communication security and can be customized to suit specific needs. We hope that this project inspires others to explore jamming technology and its applications further.
That’s it for our tutorial! We hope you found it helpful and informative. If you have any feedback, let us know. Happy jamming!