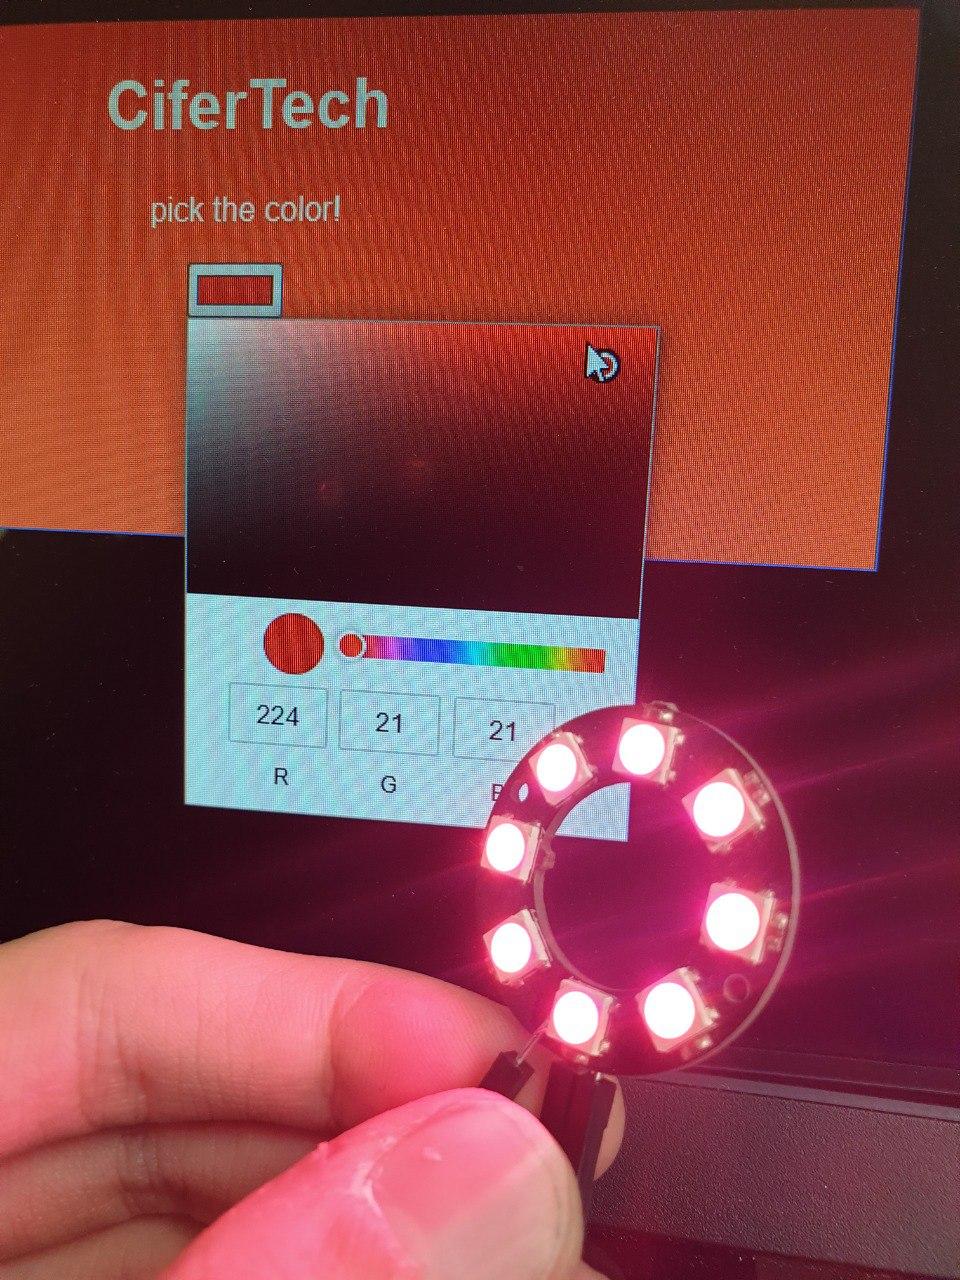

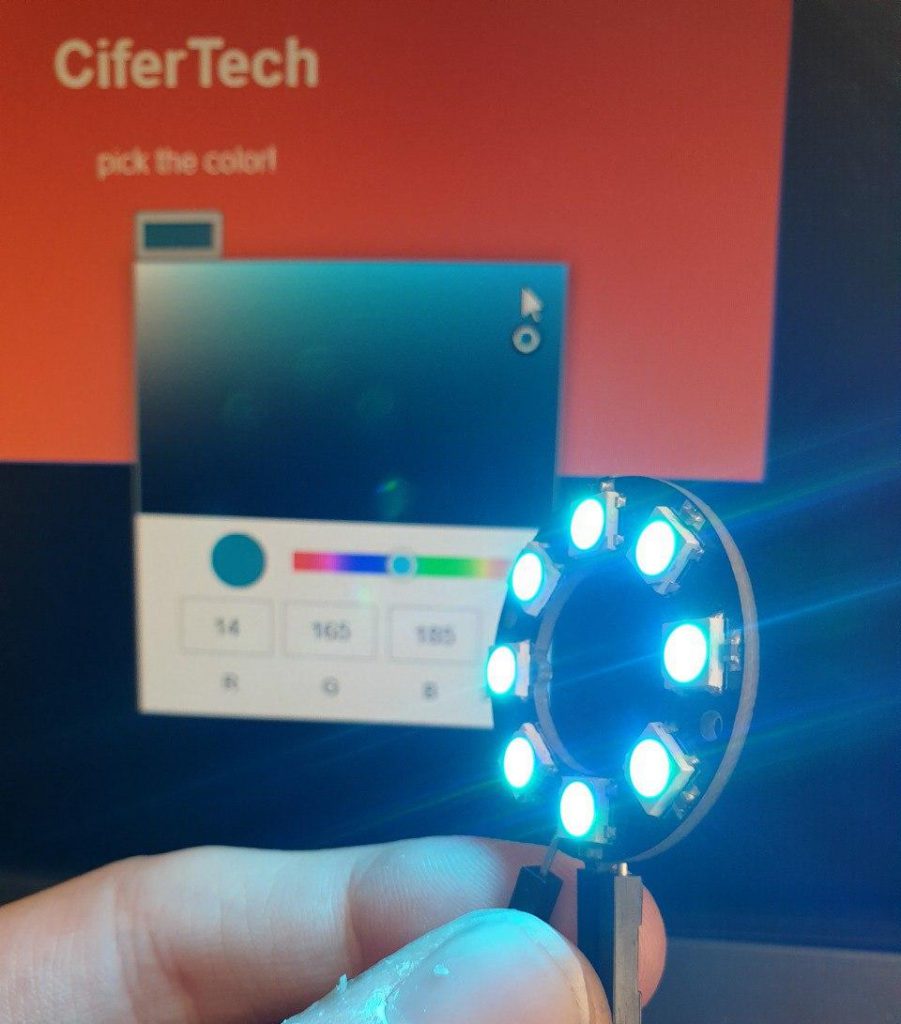
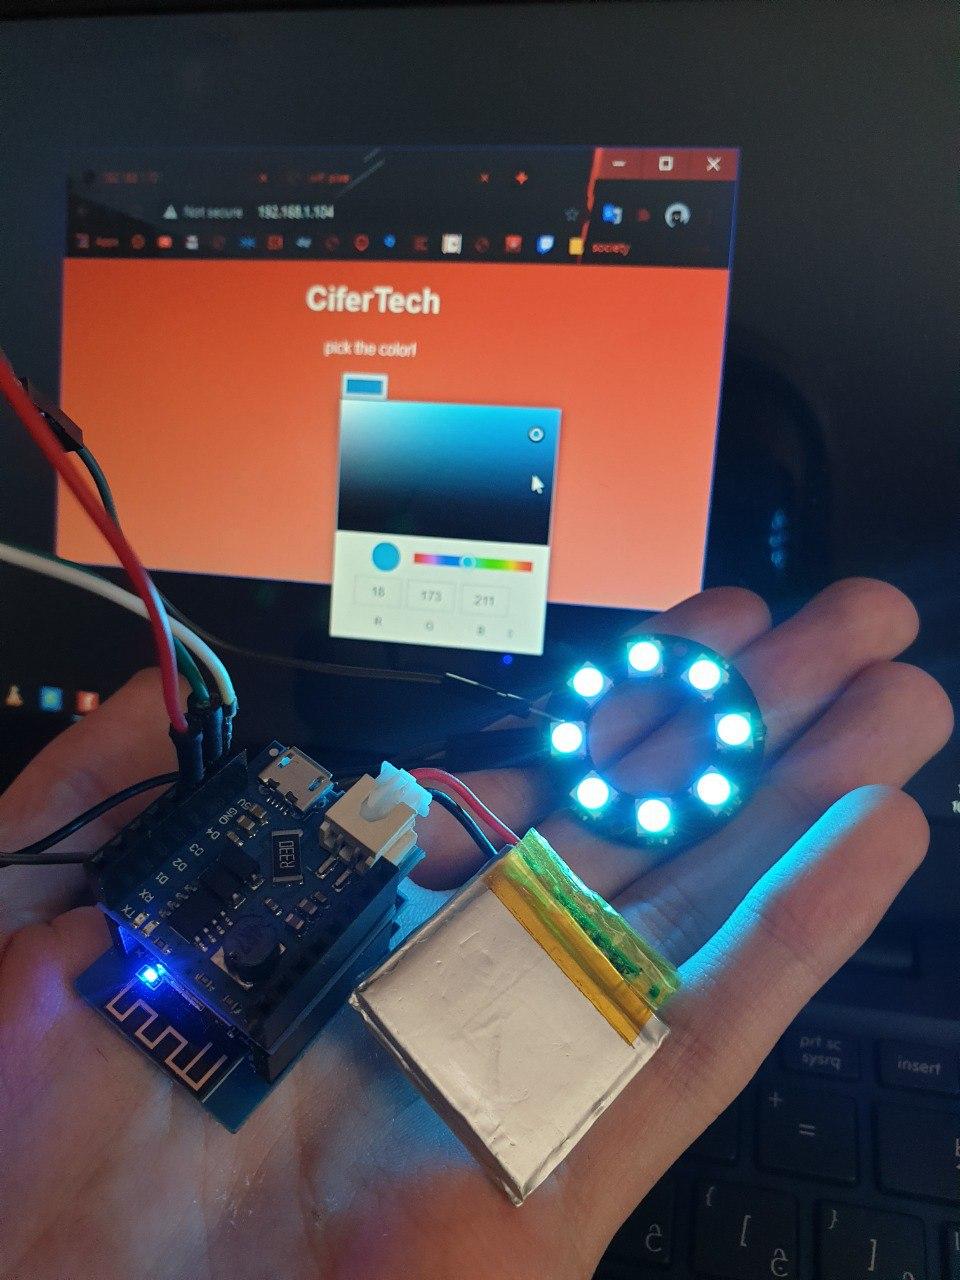
Neopixel LED is an attractive and widely used type. With very little energy consumption, they can produce millions of colored lights. Have you ever had the question of how to change the values of R, G, and B in neopixel LEDs in real time? Well, your answer is this tutorial, in this tutorial we are going to control wireless LED using nodemcu esp8266 board and build a web server. Change the mentioned values with a page in your browser and produce any color you want. Visit CiferTech for more tutorials, and be sure to follow my Instagram page to support me.
WebServer
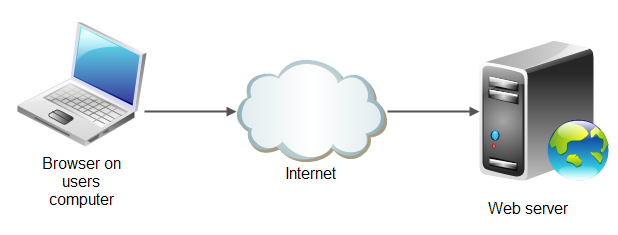
Web servers are programs whose responsibility is to accept HTTP requests sent from users, in response, web servers send information that we usually know as Html pages. Well, now let’s assume that in the HTTPS browser:
ESP8266
ESP8266 chips are among the popular items in the field of Internet of Things, which have better quality and lower price than other examples, the central core of this module is ESP8266 EX, which is actually placed under this metal shield, in addition, this shield Metal is placed in order to reduce noise and also protect the sensitive SMD parts of this module. These modules are produced in different series, including esp01 and esp12, in fact, the difference between the models is the number of GPIOs and their memory, although usually the differences they have with each other can be recognized. These modules support internal WIFI networks, these microcontrollers were first released in 2014. The ESP8266 has 13 GPIOs as well as an analog input (A0).
How it Works
In the neopixel LED wireless control project, by building a web server using the ESP8266 board, we can have full control over our neopixel ring module and the values of the main colors, i.e. red, blue, green, on a scale of 0 to 255. To change, there is also a color plot in the web server where we can visually select the desired color.
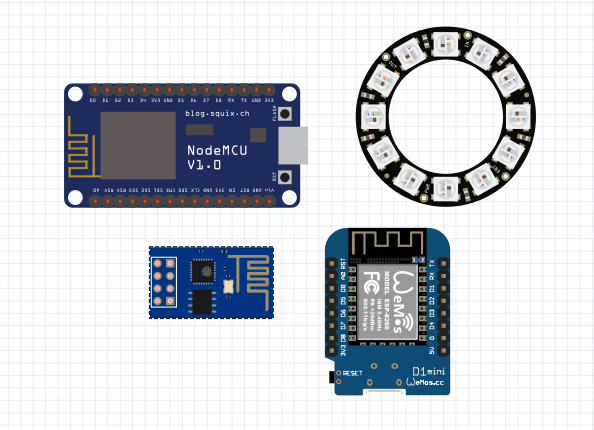
Items Needed
- Nodemcu
- Neopixel
Required libraries
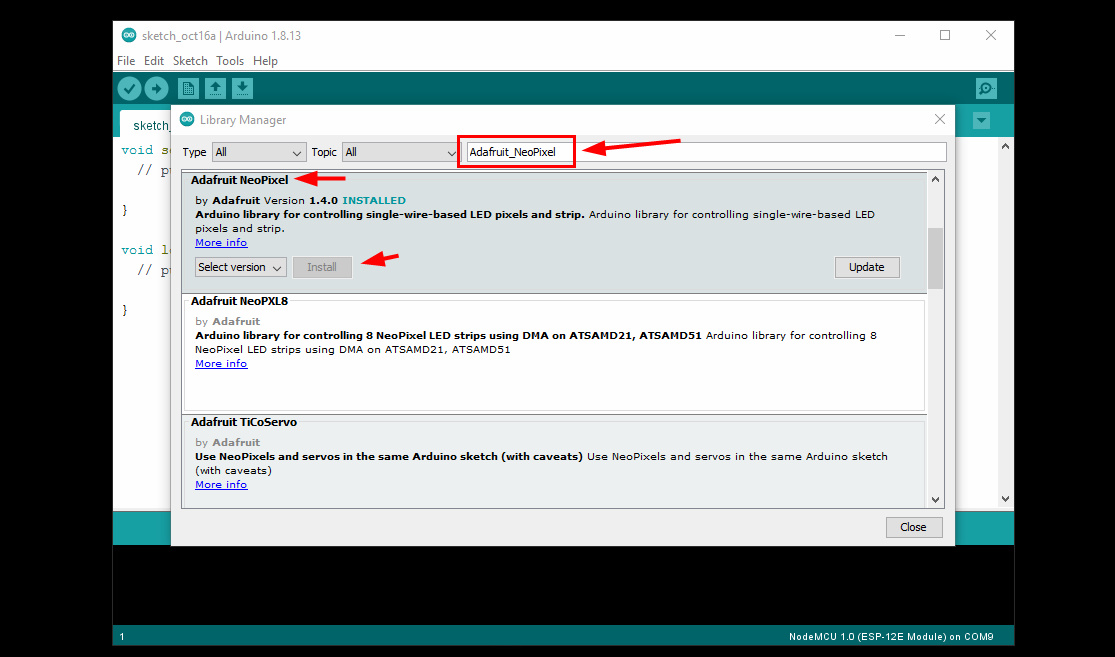
To implement the wireless LED control project, we first install the Adafruit_NeoPixel reference library in the Arduino IDE software. Follow the steps below.
- Go to Sketch > Include Library > Manage Libraries
- Search for the word Adafruit_NeoPixel.
- Install the library.
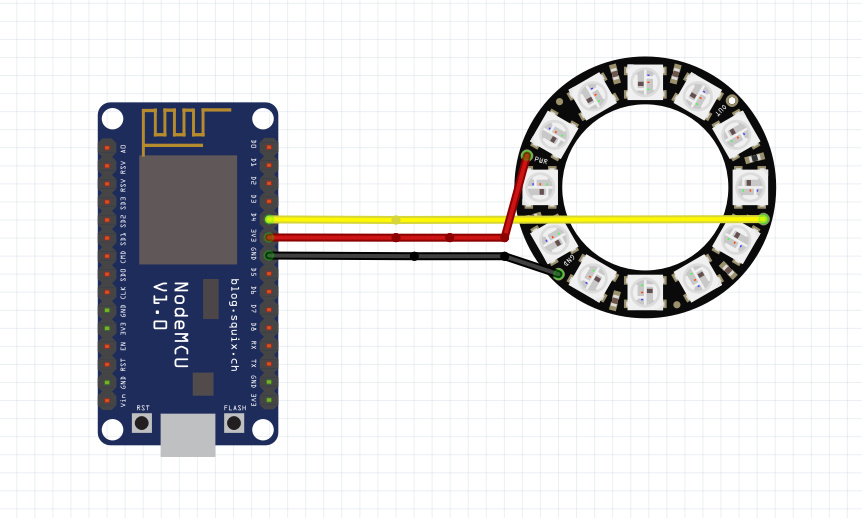
Schematic
-
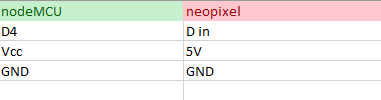
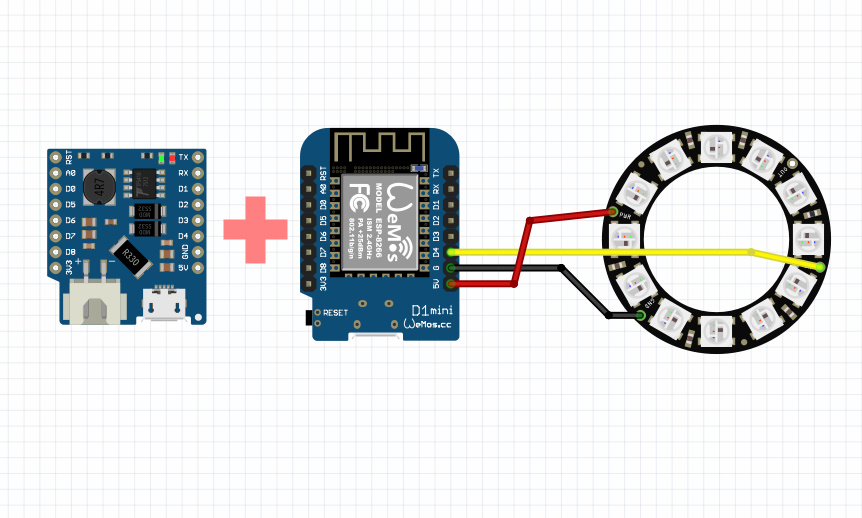
Connections for nodemcu board
-
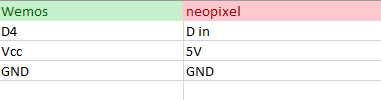
Connectors for wemos D1 mini board
Code
First, I will give explanations about the different parts of the code. At first, we added the required libraries to the code as described below.
|
1 2 3 4 5 6 |
#include <Adafruit_NeoPixel.h> #include <ESP8266WiFi.h> #include <WiFiClient.h> #include <ESP8266WebServer.h> #include <ESP8266mDNS.h> |
In this section, we will enter the desired Wi-Fi network information, including the Wi-Fi name and password.
|
1 2 |
const char *ssid = "C1F3R"; const char *password = "314159265"; |
In this section, we specify the desired base for neopixel connection and the number of required LEDs.
|
1 2 |
#define NeoPIN D4 #define NUM_LEDS 8 |
This part of the HTML code is related to the appearance of the web server.
|
1 2 3 4 5 6 7 8 9 10 11 12 13 14 15 16 17 18 19 20 21 22 |
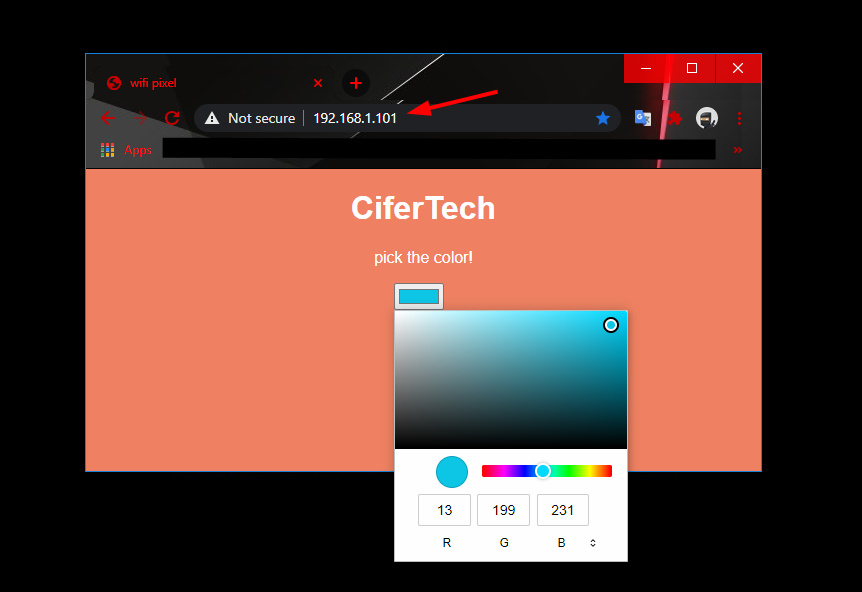
"<!DOCTYPE html>\n<html>\n\ <head>\n\ <title>wifi pixel</title>\n\ <style>\ body { background-color: #F08262; font-family: Arial; Color: #fff; }\ h1 {text-align: center;}\ p {text-align: center;}\ form {text-align: center;}\ </style>\n\ <meta name=\"viewport\" content=\"width=device-width, height=device-height, initial-scale=1.0, user-scalable=0, minimum-scale=1.0, maximum-scale=1.0\" />\n\ </head>\n\ <body>\n\ <h1>CiferTech</h1>\n\ <p>pick the color!</p>\n\ \n\ <form action=\"\" name=\"pick\" method=\"post\">\n\ <input type=\"color\" name=\"c\" value=\"%02d\" onchange=\"document.forms['pick'].submit();\" />\n\ <span onclick=\"document.forms['pick'].submit();\" style=\"font-size:16pt;\"> </span>\n\ </form>\n\ \n\ </body>\ </html>", |
The complete code of the neopixel LED wireless control project
|
1 2 3 4 5 6 7 8 9 10 11 12 13 14 15 16 17 18 19 20 21 22 23 24 25 26 27 28 29 30 31 32 33 34 35 36 37 38 39 40 41 42 43 44 45 46 47 48 49 50 51 52 53 54 55 56 57 58 59 60 61 62 63 64 65 66 67 68 69 70 71 72 73 74 75 76 77 78 79 80 81 82 83 84 85 86 87 88 89 90 91 92 93 94 95 96 97 98 99 100 101 102 103 104 105 106 107 108 109 110 111 112 113 114 115 116 117 118 119 120 121 122 123 124 125 126 127 128 129 130 131 132 133 134 135 136 137 138 139 140 141 142 143 144 145 146 147 148 149 150 151 152 153 154 155 156 157 158 159 160 161 162 163 164 165 166 167 168 169 170 171 |
#include <Adafruit_NeoPixel.h> #include <ESP8266WiFi.h> #include <WiFiClient.h> #include <ESP8266WebServer.h> #include <ESP8266mDNS.h> // Webserver Config const char *ssid = "C1F3R"; const char *password = "314159265"; ESP8266WebServer server ( 80 ); // Neopixel Config #define NeoPIN D4 #define NUM_LEDS 8 int brightness = 150; Adafruit_NeoPixel strip = Adafruit_NeoPixel(NUM_LEDS, NeoPIN, NEO_RGB + NEO_KHZ800); const int led = 13; void setup ( void ) { Serial.begin ( 115200 ); // ############## // NeoPixel start Serial.println(); strip.setBrightness(brightness); strip.begin(); strip.show(); delay(50); Serial.println("NeoPixel started"); // ######### // Webserver pinMode ( led, OUTPUT ); digitalWrite ( led, 0 ); WiFi.begin ( ssid, password ); Serial.println ( "" ); // Wait for connection while ( WiFi.status() != WL_CONNECTED ) { delay ( 500 ); Serial.print ( "." ); } Serial.println ( "" ); Serial.print ( "Connected to " ); Serial.println ( ssid ); Serial.print ( "IP address: " ); Serial.println ( WiFi.localIP() ); if ( MDNS.begin ( "esp8266" ) ) { Serial.println ( "MDNS responder started" ); } // what to do with requests server.on ( "/", handleRoot ); server.onNotFound ( handleNotFound ); server.begin(); Serial.println ( "HTTP server started" ); } void loop ( void ) { // waiting fo a client server.handleClient(); } void handleRoot() { Serial.println("Client connected"); digitalWrite ( led, 1 ); // data from the colorpicker (e.g. #FF00FF) String color = server.arg("c"); Serial.println("Color: " + color); // setting the color to the strip setNeoColor(color); // building a website char temp[5000]; int sec = millis() / 1000; int min = sec / 60; int hr = min / 60; char clr [7]; color.toCharArray(clr, 7); snprintf ( temp, 5000, "<!DOCTYPE html>\n<html>\n\ <head>\n\ <title>wifi pixel</title>\n\ <style>\ body { background-color: #F08262; font-family: Arial; Color: #fff; }\ h1 {text-align: center;}\ p {text-align: center;}\ form {text-align: center;}\ </style>\n\ <meta name=\"viewport\" content=\"width=device-width, height=device-height, initial-scale=1.0, user-scalable=0, minimum-scale=1.0, maximum-scale=1.0\" />\n\ </head>\n\ <body>\n\ <h1>CiferTech</h1>\n\ <p>pick the color!</p>\n\ \n\ <form action=\"\" name=\"pick\" method=\"post\">\n\ <input type=\"color\" name=\"c\" value=\"%02d\" onchange=\"document.forms['pick'].submit();\" />\n\ <span onclick=\"document.forms['pick'].submit();\" style=\"font-size:16pt;\"> </span>\n\ </form>\n\ \n\ </body>\ </html>", hr, min % 60, sec % 60, clr ); server.send ( 200, "text/html", temp ); digitalWrite ( led, 0 ); } void handleNotFound() { digitalWrite ( led, 1 ); String message = "File Not Found\n\n"; message += "URI: "; message += server.uri(); message += "\nMethod: "; message += ( server.method() == HTTP_GET ) ? "GET" : "POST"; message += "\nArguments: "; message += server.args(); message += "\n"; for ( uint8_t i = 0; i < server.args(); i++ ) { message += " " + server.argName ( i ) + ": " + server.arg ( i ) + "\n"; } server.send ( 404, "text/plain", message ); digitalWrite ( led, 0 ); } void setNeoColor(String value){ Serial.print("Setting Neopixel..."); // converting Hex to Int int number = (int) strtol( &value[1], NULL, 16); // splitting into three parts int r = number >> 16; int g = number >> 8 & 0xFF; int b = number & 0xFF; // DEBUG Serial.print("RGB: "); Serial.print(r, DEC); Serial.print(" "); Serial.print(g, DEC); Serial.print(" "); Serial.print(b, DEC); Serial.println(" "); // setting whole strip to the given color for(int i=0; i < NUM_LEDS; i++) { strip.setPixelColor(i, strip.Color( g, r, b ) ); } // init strip.show(); Serial.println("on."); } |
Portability
To make the wireless LED control project portable, just use the wemos board along with the battery charging shield. The battery shield allows the user to make his Internet of Things project portable, in such a way that by connecting the shield to the Wemos board and connecting the battery from the relevant connector, you will be able to charge the desired battery in addition to the size of the project in a portable way. do. The suitable lithium battery for this shield is in the voltage range of 3.3 to 4.2.
Conclusion
At the end, after uploading the code to the desired board, by resetting the board, you will be able to find the IP of the created web page in the Arduino serial monitor, and you can access the web server by searching for it in your browser. In this tutorial, by using the ESP8266 board and the Neopixel Ring module, we were able to change the values of R, G, B in the neopixel module in real-time and using a web page. Also, by using the wemos board along with the battery shield, we completed this project. Convert to a portable circuit.