


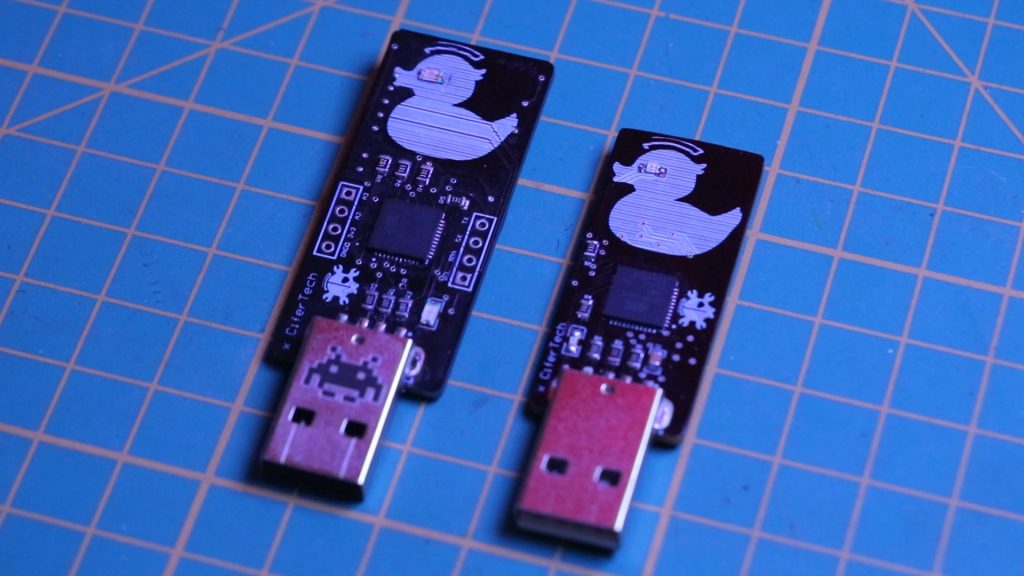
🌟 About the EvilDuck Project
The EvilDuck Project is an open-source hardware and software project designed to replicate the functionality of a well-known keystroke injection tool, the USB Rubber Ducky, but at a fraction of the cost and fully customizable. EvilDuck is a DIY keystroke injection tool capable of mimicking a USB keyboard and executing pre-written scripts when plugged into a target machine. The project is built using easily accessible hardware components, and it’s ideal for cybersecurity enthusiasts looking to experiment with penetration testing techniques.
🎯 Features
Hardware Features:
- ◾ ATmega32u4 Microcontroller: The brain of the device, capable of simulating a USB keyboard.
- ◾ SD Card Support: Store and load scripts from an SD card for flexibility in payload execution.
- ◾ AM1117 3.3V Voltage Regulator: Ensures stable power supply to the components.
- ◾ LED Indicators: Provide visual feedback on different device states like script execution, SD card errors, or script loading.
- ◾ SMD Components: Space-saving surface-mount components make the EvilDuck compact and ideal for DIY PCB design.
- ◾ Male USB A Connector: Ensures easy plug-and-play usage with any computer system.
Software Features:
- ◾ Predefined Commands: EvilDuck supports a variety of keystroke commands such as
STRING,DELAY,CTRL,ALT, and many more. - ◾ Flexible Script Loading: EvilDuck can load scripts from an SD card, making it easy to swap payloads on the go.
- ◾ LED Feedback: Customizable LED feedback based on script execution status, SD card presence, and other error conditions.
- ◾ Easy-to-Write Scripts: EvilDuck uses simple commands to write powerful scripts that can execute keystroke-based payloads.
🎯 Core Functions
EvilDuck’s core functions revolve around simulating a USB keyboard and sending keystrokes to the target machine in rapid succession. The primary operations include:
- Keystroke Injection: EvilDuck can simulate typing commands, passwords, or payloads, just like the well-known USB Rubber Ducky.
- Automated Payload Execution: With scripts stored on the SD card, EvilDuck automatically reads and executes predefined commands.
- LED Feedback: The LED indicators help in identifying the status of the script execution or any issues like missing SD cards or scripts.

🧰 Getting Started
Getting started with the EvilDuck project is straightforward. Here’s how to begin:
Hardware:
- 1. Gather Components:
- ATmega32u4 microcontroller
- SD card reader
- SMD LEDs
- AM1117 3.3V voltage regulator
- Resistors and wires for connections
- Male USB A connector
- 2. Build on Breadboard: If you’re experimenting with the EvilDuck and don’t have a custom PCB ready, you can assemble the components on a breadboard for testing.
- 3. Soldering: If you’re printing a PCB, solder the components (ATmega32u4, SD card reader, LEDs, and resistors) carefully. The SMD components make this more compact but require precision in soldering.
Software:
- 1. Install Arduino IDE: EvilDuck scripts are written and uploaded using the Arduino IDE.
- 2. Set Up Libraries: Make sure to install necessary libraries like
Keyboard.hfor simulating keystrokes. - 3. Write Your Payload: Create your script and load it onto the SD card. A script may look something like:
1234567GUI rDELAY 500STRING notepadENTERDELAY 1000STRING EvilDuck is live!ENTER
- 4. Load the Script: Insert the SD card into the SD card reader connected to the EvilDuck and plug it into the target machine.
EvilDuck Commands
When creating scripts for EvilDuck, you use a set of predefined commands to simulate keystrokes and control the flow of script execution. Each command performs a specific action, such as typing text, pressing a key, or introducing a delay. Understanding these commands and how to use them effectively is crucial for writing scripts that work smoothly.
Below is an in-depth explanation of the available commands for EvilDuck:
1. STRING
The STRING command types out a string of text, just as if you were manually typing on the keyboard. This is useful for typing out phrases, commands, or any text-based input.
Syntax:
|
1 |
STRING <text> |
Example:
|
1 |
STRING Hello, World! |
This command types “Hello, World!” wherever the cursor is active.
2. DELAY
The DELAY command introduces a pause in the execution of the script. The delay is measured in milliseconds, allowing for precise control over timing. Delays are useful for waiting for programs or dialogs to load before typing further commands.
Syntax:
|
1 |
DELAY <milliseconds> |
Example:
|
1 |
DELAY 1000 |
This introduces a 1-second delay (1000 milliseconds) before the next command is executed.
3. REM
The REM command is used to add comments in your script. These comments do not affect the execution of the script and are used for documentation purposes.
Syntax:
|
1 |
REM <comment> |
Example:
|
1 |
REM This is a comment |
This command will be ignored during script execution.
4. Key Press Commands
EvilDuck supports many standard keyboard key presses, allowing you to simulate a wide range of actions. Key press commands include individual keys like ENTER, CTRL, and function keys (F1-F12).
Common Keys:
- ◾ ENTER: Simulates the Enter key.
- ◾ TAB: Simulates the Tab key.
- ◾ ESC: Simulates the Escape key.
- ◾ SPACE: Simulates the Spacebar.
- ◾ DELETE: Simulates the Delete key.
Arrow Keys:
- ◾ UPARROW or UP: Simulates the Up Arrow key.
- ◾ DOWNARROW or DOWN: Simulates the Down Arrow key.
- ◾ LEFTARROW or LEFT: Simulates the Left Arrow key.
- ◾ RIGHTARROW or RIGHT: Simulates the Right Arrow key.
Modifier Keys:
- ◾ CTRL: Simulates the Control key.
- ◾ ALT: Simulates the Alt key.
- ◾ SHIFT: Simulates the Shift key.
- ◾ GUI: Simulates the Windows key (or Command key on macOS).
Function Keys:
EvilDuck supports function keys F1 through F12.
Syntax:
|
1 |
<F-key> |
Example:
|
1 |
F1 |
This simulates pressing the F1 key.
5. Combining Keys
You can combine multiple key presses by specifying them on the same line, separated by spaces. This allows you to simulate pressing multiple keys at once (e.g., CTRL + ALT + DELETE).
Example:
|
1 |
CTRL ALT DELETE |
This simulates pressing Ctrl, Alt, and Delete together, which is useful for triggering system commands like locking the screen.
🔌 Schematic
The basic EvilDuck schematic consists of the following key connections:
- 1. Connect the SD card module to the Arduino Micro using these pins:
- CS -> Pin 4
- MOSI -> Pin 11
- MISO -> Pin 12
- SCK -> Pin 13
- 2. Connect the status LED:
- Anode -> Pin 9
- Cathode -> GND

👀 Use Cases
EvilDuck can be employed in various cybersecurity scenarios:
- ◾ Penetration Testing: Use EvilDuck to automate payload delivery during a pentest. Simulate phishing attacks by typing in malicious commands or injecting payloads.
- ◾ System Auditing: EvilDuck can automate system checks or vulnerability assessments by typing commands into terminals or command prompts.
- ◾ Educational Demonstrations: EvilDuck is a fantastic tool for teaching students about cybersecurity risks related to USB devices and keystroke injection attacks.
- ◾ Cybersecurity Awareness: EvilDuck can be used to demonstrate the dangers of trusting unknown USB devices.
![]()
Code & PCB
If you’re interested in building this project, the code and schematic are available on GitHub. Simply visit the GitHub repository to download the necessary files. Feel free to test the code and share your feedback or improvements.
GitHub repository: github.com/cifertech/EvilDuck
 Special Thanks to Our Sponsor: JLCPCB
No project is complete without the right tools and materials. That’s where our sponsor, JLCPCB, stepped in to provide essential support for this project. JLCPCBis a leading provider of high-quality printed circuit boards (PCBs) and PCB assembly services.
Simply head over to jlcpcb.com, upload your PCB design files, select your preferences, and Your custom PCBs are on their way to you in no time.

Check out JLCPCB Engineers Day deals to Get $125 off coupons, Bulk order discount, and the chance to win a $150 Amazon gift card. Check out the JLCPCB website.
🌟 Conclusion
The EvilDuck Project is a powerful, customizable, and budget-friendly alternative to commercial USB keystroke injection tools. By using widely available components and an easy-to-understand script format, you can create flexible payloads for various cybersecurity tasks, from penetration testing to system automation.
Whether you’re a hobbyist exploring hardware hacking, a researcher diving into security vulnerabilities, or an educator teaching the importance of cybersecurity, EvilDuck is the perfect platform to build on. With its open-source nature, the possibilities are endless!